Networking
|
Size: 61360
Comment: let's not include a mockup that is mostly wrong
|
Size: 61083
Comment: tidies up cellular setup on the PC (bug 557243)
|
| Deletions are marked like this. | Additions are marked like this. |
| Line 64: | Line 64: |
| 1. [[#mobile-menu|mobile]] (present by default for each mobile device present) | 1. [[#cellular-menu-pc|cellular]] (present by default for each cellular device present) |
| Line 546: | Line 546: |
| ## ||<tablestyle="clear: right; float: right; margin: 0 0 1em 1em;" style="border: none;">{{attachment:mobile.jpg}}|| | |
| Line 549: | Line 548: |
| If any cellular devices are connected, or if the computer has any Bluetooth cards turned on, the next section of the network menu should be for cellular connections. (We deliberately exclude from this menu the interface for turning Bluetooth as a whole on or off.) The section should begin with a “Cellular Setup…” item that opens [[#mobile-setup-window|the “Cellular Setup” window]]. Following this, if a cellular device is connected or a Bluetooth modem is connected and configured, and any cellular connections have previously been configured, these connections should be listed as checkmark items. Toggling an item should connect or disconnect. |
If any cellular devices are connected to a PC, or if it has any Bluetooth cards turned on, the network menu should have a cellular section. (We deliberately exclude from this menu the interface for turning Bluetooth as a whole on or off.) The cellular section should begin with a “Cellular Setup…” item that opens [[#mobile-setup-window|the “Cellular Setup” window]]. Following this, if a cellular device is connected or a Bluetooth modem is connected and configured, and any cellular connections have previously been configured, these connections should be listed as switch items. Toggling an item should connect or disconnect. |
| Line 591: | Line 590: |
| <<Anchor(mobile-setup-prompted)>> ===== Setting up a mobile connection, prompted ===== |
<<Anchor(cellular-setup-prompted)>><<Anchor(mobile-setup-prompted)>> ==== Setting up a cellular connection, prompted ==== |
| Line 596: | Line 595: |
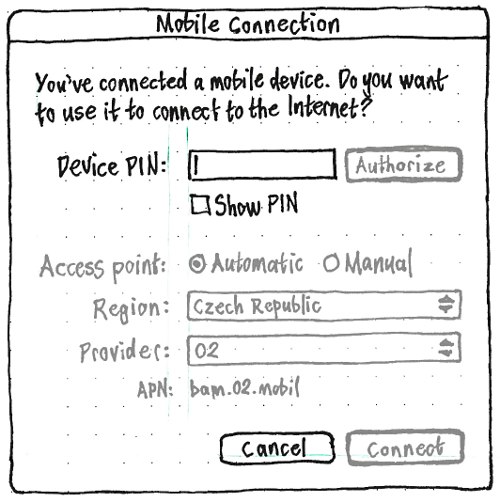
| If, while you are logged in and not connected to the Internet, you connect a cellular device to the computer, a “Cellular Connection” dialog should appear. If you disconnect the device, or connect the device to the Internet some other way, the dialog should close. ''Should the dialog open even if you’re already connected to the Internet some other way?'' The dialog’s primary text should be “You’ve connected a mobile device. Do you want to use it to connect to the Internet?” If the device requires a PIN, there should be a “Device PIN:” field, a “Show PIN” checkbox, and an “Authorize” button. |
If, while you are logged in, you connect a cellular device to a PC, a “Cellular Connection” dialog should appear. If you disconnect the device, the dialog should close automatically. The dialog’s primary text should be “You’ve connected a mobile device. Do you want to use it to connect to the Internet?” If the device requires a PIN, there should be a “Device PIN:” field, a “Show PIN” checkbox, and an “Authorize” button. |
This is an incomplete, in-progress, and partly-implemented specification for Ubuntu’s networking features on PC and phone.
Ubuntu lets you connect to the Internet and other networks in various ways, including Ethernet (PC only), wi-fi, cellular data, and Bluetooth. Currently this is implemented using NetworkManager (upstream, Ubuntu package, Ubuntu bug reports).
If you need help with networking in Ubuntu, see Ubuntu Help “Internet and Networking”.
Contents
- Overall interface structure
- When an app tries to use the Internet
- Connections
- VPNs
- Proxies
- Firewall (PC only)
- Sharing
- PC-specific designs (to be integrated above)
- Future work
- Unresolved issues
Overall interface structure
On all form factors, the networking interface is based on settings panels and indicator menus. On a phone or tablet, both the panels and the menus are more spread out than on a PC, because network connection is usually more variable and more expensive than it is on a PC.
On all form factors, there are also occasional dialogs (for example, for Wi-Fi suggestions or captive portals) and notification bubbles.
Settings
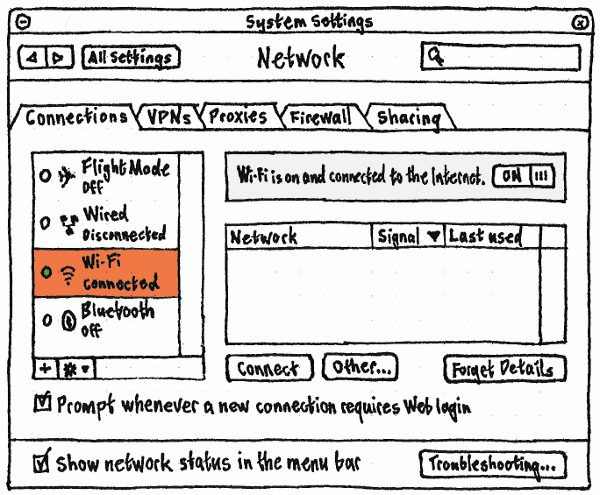
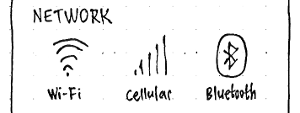
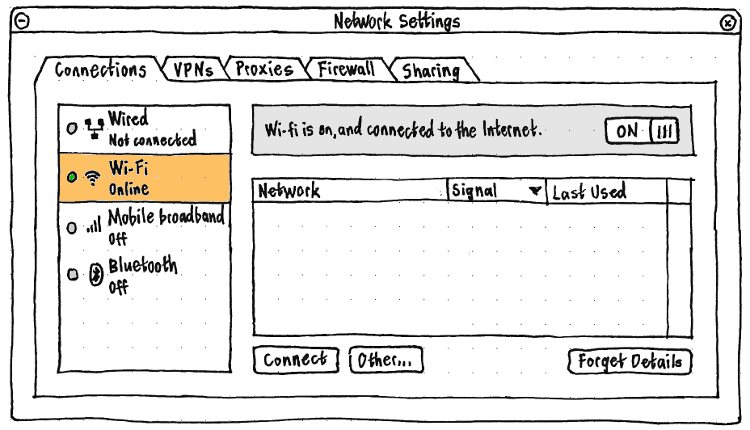
On a PC, networking settings should be shown in a single System Settings “Network” panel, with tabs for “Connections”, “VPNs”, “Proxies”, “Firewall”, and “Sharing”. At the bottom left of the panel should be a “Show network status in the menu bar” checkbox (fixing bug 829673).
On a phone or tablet
because cellular and Bluetooth connections are networking settings should be split across the System Settings “Flight Mode” top-level item, and the “Wi-Fi”, “Cellular”, and “Bluetooth” screens.
Network status menu (PC)
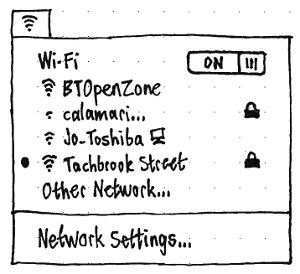
Simple case: |
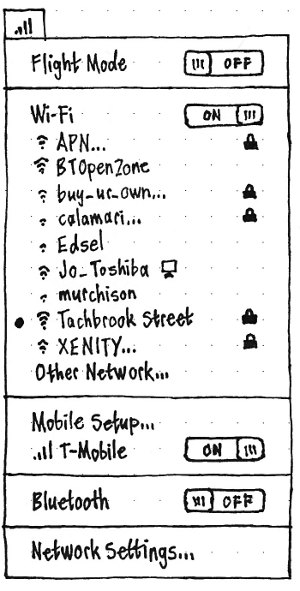
Pathological case: |
|
|
People will usually open the menu when something is wrong with their Internet connection. The menu should let you see at a glance whether you are connected to the network, and if so how; switch quickly between likely connection methods; and access more detailed network information and settings.
Title
The title of the menu should show the most unusual method by which the computer is currently connected to the Internet, or that it is not connected at all. So it should consist of an icon:
if the computer is in Flight Mode, a flight mode icon; ✈
otherwise, if there is an active mobile broadband connection, the mobile broadband icon for the current signal strength;
otherwise, if there is an active wired connection, the wired connection icon;

otherwise, if there is an active wireless connection, the wireless icon for the current signal strength;

otherwise, if a mobile device is connected but has no network connection, the mobile disconnected icon (because a PC needs to distinguish this state from “no mobile device connected”, which a phone doesn’t need to do);

otherwise, if a wireless card is turned on but has no network connection, the wireless disconnected icon;

otherwise, if there is a wired networking device but it is not detected, the wired disconnected icon;

otherwise, a red
 icon.
icon.
The accessible name for the title should consist of the word “Network”, a space, and then bracketed text equivalent to the icon. For example, “Network (Flight Mode on)”, “Network (mobile, 1 bar)”, “Network (wireless, 70%)”, “Network (wired)”, “Network (mobile, disconnected)”, “Network (wireless, disconnected)”, or “Network (none)”, respectively.
Structure
If the networking service cannot be found, is in the process of being restarted, or no networking devices are available (e.g. no Ethernet card or wireless card), the menu should contain only an insensitive “Networking not available” item (deliberately sentence case), a separator, and “Network Settings…”. (This should hardly ever happen.)
|
When there is networking, the menu should consist of some combination of sections, in order:
flight mode (not present by default)
wired (not present by default)
wi-fi (present by default for each wi-fi card present)
cellular (present by default for each cellular device present)
Bluetooth (present by default for each Bluetooth device present)
VPNs (not present by default)
connection sharing (not present by default)
- the “Network Settings…” item (always present).
Most of the time, only a few of these sections will appear — depending on what kinds of cards are fitted, what devices are connected, and other settings as specified later. Any two adjacent sections should have a separator between them, except that “Share Connection…” and “Network Settings…” should not have a separator between them.
Activity, Cellular, and Network indicators (phone/tablet)
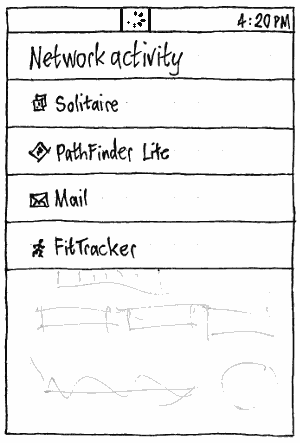
Because connectivity on a phone is much more variable and usually more expensive, the phone should have two networking indicators: the “Network activity” indicator (not for 13.10) and the “Network” indicator.
|
The “Network activity” indicator, a spinner, should be present whenever any process has used the network in the past five seconds. Its menu should list all applications that have used the network in the past five seconds, most recent first but updating only once every five seconds.
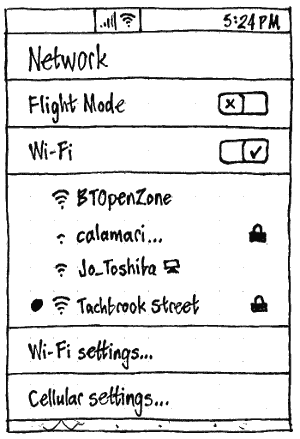
The “Network” indicator should have three components. The first component should be:
- the flight mode icon if flight mode is on; otherwise
- “No SIM” if no SIM is detected; otherwise
“SIM locked” if a SIM is present but locked; otherwise
- “SIM error” if a SIM is present but otherwise unusable; otherwise
- “No service” if no cellular network has been chosen; otherwise
- from 0 to 5 bars representing the call signal strength, if wi-fi is on; otherwise
- from 0 to 5 bars representing the cellular data signal strength, if cellular data is on; otherwise
- from 0 to 5 bars representing the call signal strength, if there is no current data connection.
The second component should be 🌐 a roaming icon if you are currently using data roaming. Otherwise it should not be present at all.
The third component should be:
- an animated wi-fi icon if wi-fi is connecting; otherwise
- from 0 to 4 arcs representing the wi-fi signal strength if wi-fi is on; otherwise
- “3G” if the current data connection is 3G
- “EV” if it is EV-DO
- “H+” if it is HSPA+
- “L” if it is LTE
“E” if it is EDGE (up to 236 kbit/s)
a tortoise if it is slower than EDGE, for example GPRS (up to 20 kbit/s) or 1xRTT (up to 153 kbit/s)
- “×” if there is no current data connection.
(Because wi-fi is displayed instead of cellular data connection, you may be unaware that you have lost the cellular data connection necessary to send an MMS. This is the tradeoff for the space saved by showing just one at a time.)
|
If the SIM is locked, the “Network” menu should include an “Unlock SIM…” item immediately before “Cellular settings…”, and that item should be insensitive whenever the unlock UI is currently being shown. Regardless, when wi-fi is on, the menu should list wi-fi networks in the same way as the Wi-Fi screen of System Settings, without the “Other network…” item, and with an insensitive item “No networks detected” instead of the placeholder text.
When an app tries to use the Internet
(bug 1275761)
TBD
Connections
Flight mode
Turning on Flight Mode should turn off all transmitting connection types — wireless, mobile, and Bluetooth. Turning off Flight Mode itself should resume whichever of those connections were on before Flight Mode was activated.
However, if you turn on any transmitting connection type while Flight Mode is on, Flight Mode should turn off automatically, but this should not turn on any of the other connection types. For example, if you turn on Flight Mode on an airplane that offers wireless Internet, turning on wireless later should not also turn on Bluetooth.
PC
At the top of the connection type pane should be a “Flight Mode” item, with a ✈ icon.
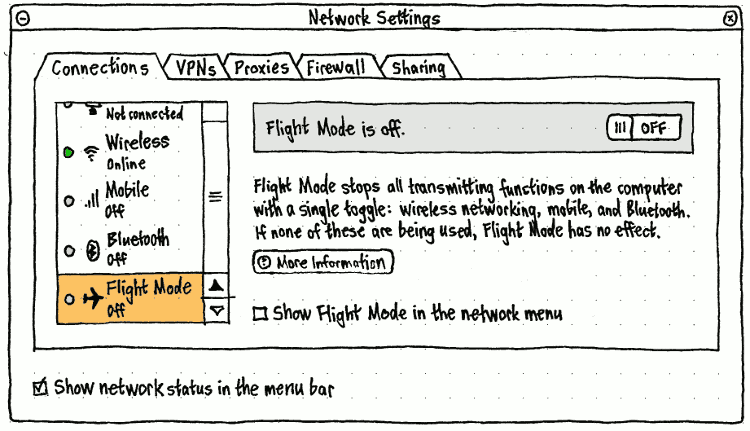
Erratum: The item should be at the top of the pane, not the bottom.
The “Show Flight Mode in the network menu” checkbox should be insensitive whenever “Show network status in the menu bar” is unchecked.

Whenever “Show Flight Mode in the network menu” is checked, the network menu should begin with a “Flight Mode” toggle item followed by a separator.
Whenever Flight Mode is on, the title of the network menu should also be a ✈ icon.
Phone

The quick access area should include a “Flight mode” switch, because it is the sort of setting you need to change quickly, and it alters the state of settings in multiple other screens. Its icon should represent its current state. Whenever you toggle Flight Mode in either direction, the icon should become a spinner until all connections have stopped or resumed as appropriate.
Common behavior across connection types
PC: Connections in the PC “Network” panel

In the “Connections” tab, the device pane should list each device or card through which you could make a network connection. The items in the list should be, in this default order:
- If the machine has any Ethernet cards, one item for each Ethernet card.
- If the machine has any wireless cards, one item for each wireless card.
- If the machine has any connected mobile broadband devices, one item for each device.
- If the machine has any connected Bluetooth devices, one item for each Bluetooth device.
Each item in the list should have four elements:
- a colored bead icon representing whether the device’s state — powered off (grey), offline (red), connected but not on the Internet (yellow), or online (green);
- an icon representing the type of device (e.g. the Bluetooth icon);
- a label for the type of device (e.g. “Wired” or “Bluetooth”)
- a caption for the connection state — “Off”, “Not connected”, “Connected”, or “Online”.
The state icon and device type icon should both have empty “” accessible labels, because the same information is conveyed in the adjacent text.
The order of the items should determine in which order Ubuntu tries to use them, when turned on, to establish an Internet connection. Each item should be reorderable by dragging it (hinted at by switching to a drag cursor on mousedown), or by using Ctrl Up or Ctrl Down when the item is selected.
At the bottom of the panel should be a checkbox, “Prompt whenever a new connection requires Web login”, checked by default for new user accounts. Changing it from unchecked to checked state (even by unchecking it then re-checking it) should immediately check the current connection (fixing bug 1072675).
Connection progress in the network/wi-fi menu

While Ubuntu for PC is trying to establish any network connection, the title of the network menu should be a spinner. Similarly, while Ubuntu Phone is trying to establish a wi-fi connection, the wi-fi indicator should be an animated wi-fi icon.
In both cases, the item for that connection should have a spinner too. If the connection is successful, the latter spinner should be replaced by a radio mark or checkmark as appropriate.
Connecting to a captive portal
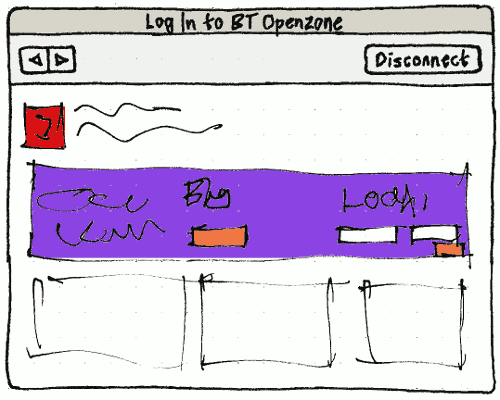
Whenever Ubuntu makes a new network connection, if “Prompt whenever a new connection requires Web login” is checked, it should perform HTTP and DNS checks that the connection is valid. If it is not, a “Log In to {connection name}” dialog (on PC) or full-screen dialog (on phone) should open with a Web frame for the login page.
In the dialog, the Back and Forward buttons should behave as for a Web browser. The connection check should run again five seconds after you navigate to each page in the dialog, or 30 seconds * 2n since the nth connection check while the dialog has been open, whichever is sooner.
The dialog should close if a connection check succeeds, if you choose “Disconnect” in the dialog itself, or if you disconnect anywhere else (such as from the menu).
<xnox> e.g. in the installer we already are doing connectivity check against a known document http://start.ubuntu.com/connectivity-check.html
<xnox> which should have md5sum 4589f42e1546aa47ca181e5d949d310b
<xnox> mpt: the most silly thing about captive portals, is that some of them don't require one to login at all - just open it & look at advertisement. E.g. Virgin WiFi on the underground, after the first login, simply auto-redirects you to a ad.
<xnox> So one can try opening any page in the background to see if it's enough to establish connection ;-)
...
<xnox> mpt: it's reasonable to try this hack without pooping anything up, and if it fails then poop up the OpenZone dialog.
<mpt> xnox, as in make two HTTP requests and discard the first?
<mpt> That could work.
<xnox> yeah.
Disconnection
If you stop any connection from software (e.g. by choosing “Disconnect” in the menu), no notification bubble should appear (fixing bug 345824).
If a connection ends in any other way, a notification bubble should appear with the icon of the connection, “Disconnected” as primary text, and the name of the connection as secondary text. If there are no other active connections, the primary text should be “Disconnected — offline”.
Wi-Fi
Wi-Fi settings on PC
Wi-Fi in System Settings “Network” panel
|
For each wireless card detected, there should be an item in the connection type pane of the “Connections” tab of the “Network” panel of System Settings. In the usual case where there is only one card, the item should be labelled “Wi-Fi”. In the rare case that the computer has more than one wireless card, it should be labelled “Wi-Fi ({kernel ID})”, e.g. “Wi-Fi (wl0)”.
At the bottom of the panel for each card should be a checkbox, “Let other users connect to these networks automatically”, checked by default.
Wi-Fi in the network menu
|
|
Regardless of form factor, the network menu should have a section for each Wi-Fi card present. (Most devices have exactly one Wi-Fi card.) The section should consist of:
A toggle item for powering the card on and off. As with the Network Settings, in the usual case where there is only one wireless card, this item’s label should be simply “Wi-Fi”. In the rare case where there is more than one wireless card, it should be “Wi-Fi X”, where X = the kernel ID for the card, for example “Wi-Fi wl0”.
- If the card is powered on, up to 6 items (phone) or 20 items (PC) representing known Wi-Fi networks, all sorted alphabetically:
- up to one item representing the network this card is connected to (or currently trying to connect to), if any;
- the strongest of the currently-detected networks that this card has previously connected to, if any;
- if any slots remain, the strongest of the other broadcast networks currently detected.
An “Other Network…” item that opens the “Connect to Wi-Fi Network” dialog. If the card does not currently detect any other broadcast networks, the name of the item should instead be “Hidden Network…”. If more broadcast networks have been detected than are shown in the menu, the item text should end with a count of all detected networks in brackets, e.g. “Other Network… (11 detected)”.
The item for any Wi-Fi network should consist of:
a radio mark if the card is connected to this network, or a spinner if it is currently trying to connect;
- an icon indicating signal strength, at the leading end;
- the name of the network;
- a computer icon representing a computer-to-computer network, if appropriate;
- a padlock icon representing an encrypted network, if applicable, at the trailing end
an accessible name of the form “(strength) (encrypted) name”, for example “(22%) edsel” or “(91%) (encrypted) Tachbrook Street”.
Re-selecting the item for a wireless network that is currently connected should disconnect from that network.
Wi-Fi settings on phone
“Wi-Fi” screen of System Settings
|
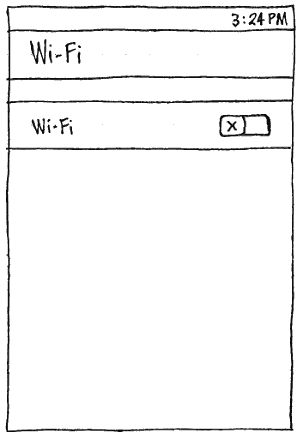
Whenever Wi-Fi is off, no other controls should be present in that screen.
|
Erratum: “Other network ▶” should be “Other network…”. |
|
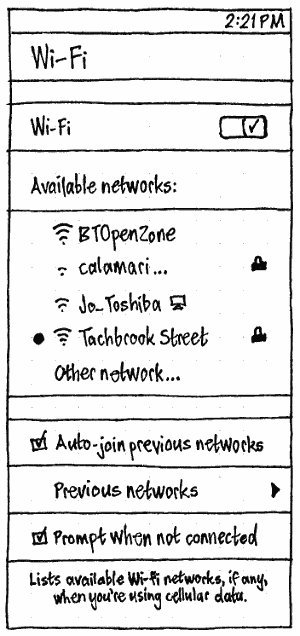
Whenever Wi-Fi is on and you visit the “Wi-Fi” screen, “Available networks:” should be followed by the spinner, and a list of networks:
- If you are currently connected to wi-fi, the currently-connected network plus any networks so far detected.
- If you are not, any networks so far detected, or the placeholder text “None detected yet” if there are none.
Once scanning completes, the spinner should disappear. If no networks were detected, “None detected yet” should change to “None detected”. The list should update every 10 seconds, with the spinner reappearing above the about-to-be-updated list.
Regardless of situation, the list should end with an “Other network…” item.
In the “Other network” sheet, “Security” should be a popup menu listing the available security types (“None”, “WPA”, “WPA Enterprise”, etc). The fields following “Security” should be whichever are appropriate for the chosen Security type: none for “None”, a “Password” field for “WPA”, “Login Name” and “Password” fields for “WPA Enterprise”, and so on. Whenever there is a “Password” field, it should be followed by a “Show password” checkbox, unchecked by default (bug 1236261).
“Connect” should be sensitive whenever the current values for those fields are plausible. When you choose it, a spinner should appear on its leading side until connection is complete. If authentication fails, the first authentication field (e.g. “Password”) should be focused and have error highlight. If there is any other error, the “Network” field should be focused and have error highlight. If connection succeeds, Ubuntu should return to the “Wi-Fi” screen, with the network list scrolled enough to show the connected network as a newly-added item.
|
|
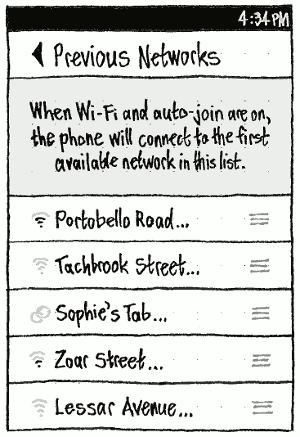
The “Previous networks” screen should list all remembered previously-used wi-fi networks, in the order in which they would be chosen. Pressing on a network should make it draggable so that you can reorder the list.
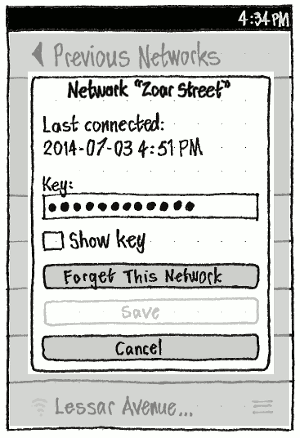
On the screen for an individual network, “Revert” and “Save” should be sensitive whenever you have made any changes since the details were last saved. If you choose “Forget This Network”, you should be returned to the “Previous networks” screen with that network removed from the list.
Connecting to wi-fi, prompted
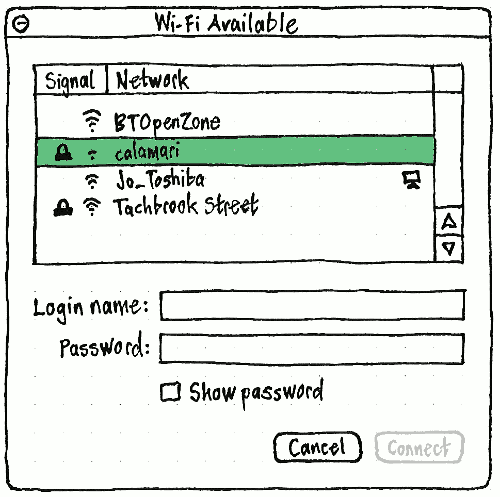
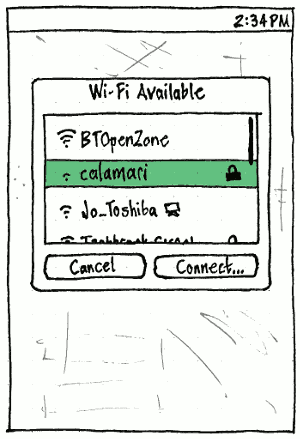
If you are not connected to the Internet, and wi-fi is on, and wi-fi networks are available, and “Prompt when not connected” is checked, and at least two hours or one system sleep has elapsed since you were last prompted, and (if you are on the phone) you try to use the Internet either unsuccessfully or using cellular data — then a dialog should appear suggesting that you connect to wi-fi.
On the PC, the dialog should morph to contain the authentication fields (if any) appropriate to the selected network. To avoid wobbling if you scroll through the list with the keyboard, this should happen on a time delay whenever the newly-chosen network has a different security method from the previous one: (1) “Connect” becomes insensitive; (2) the authentication fields become insensitive; (3) the dialog waits for up to one second in case you change the selection again; (4) the window resizes over half a second as the new, sensitive, authentication fields (if any) replace the old insensitive ones; (4) “Connect” resumes sensitivity; (5) any keyboard events applying outside the network list are processed.
On the phone, authentication should be handled separately using the standard authentication dialog instead, because there isn’t room for the network list and authentication fields in a single dialog above the on-screen keyboard.
On both form factors, if the authentication fields include a “Password” field, it should be followed by a “Show password” checkbox, unchecked by default (bug 1236261).
Connecting to wi-fi, unprompted
There are three ways for you, unprompted, to connect the computer to a wireless network:
- by choosing it from the network menu
- by selecting it and choosing “Connect”, or by double-clicking it, in the Network Settings window
- by using the “Connect to Wireless Network” dialog accessed from either the menu or the Network Settings window.
Specifying a network any of these ways should cause Ubuntu to try connecting to it.
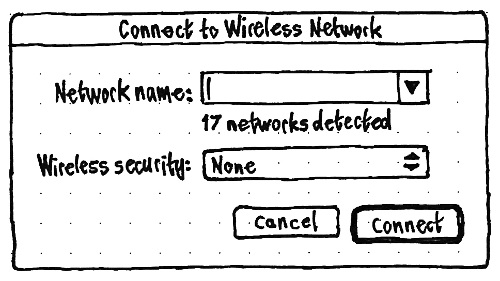
In the “Connect to Wireless Network” dialog, the “Network name” combo box should default to being empty; its menu should contain all the detected wireless networks, sorted alphabetically. Below the combo box should be a count of the detected networks, equalling non-hidden networks plus hidden APs.
This should be followed by a “Wireless security:” option menu, listing all the types of wireless authentication knows about, in alphabetical order except that “None” should be first. If Ubuntu is confident about which authentication type the selected network uses, the item for that type should end with “(detected)”, and the menu should change to select it automatically when you choose that network.

Whenever a “Wireless security:” method is chosen — either automatically or manually — the dialog should morph to show the authentication controls relevant to that method, replacing any authentication controls relevant to the previously chosen method.
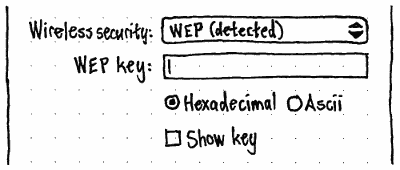

Erratum: The “Hexadecimal” and “Ascii” radio buttons should not be present.
- For WEP, these controls should be a “WEP key:” field, and a “Show key” checkbox controlling whether the field contents are readable. Any non-Ascii characters entered in the field should be ignored with a beep. The “Connect” button should be sensitive only when the field contains exactly 5, 10, 13, or 26 characters.
- For WPA, the controls should be a “WPA key:” field, and a “Show key” checkbox controlling whether the field contents are readable. The “Connect” button should be sensitive only when the field contains from 8 to 64 characters.
Should we indicate an incorrect number of characters more obviously than by desensitizing the button?

When you choose “Connect”, the dialog should not close immediately. Instead, in addition to the standard wireless connection progress feedback:
- While Ubuntu is trying to connect:
- A spinner and the text “Connecting…” should appear at the bottom leading corner of the dialog.
- All controls in the dialog, except for the “Cancel” button, should become insensitive.
- The “Cancel” button should change to “Stop” without changing size. If you choosing “Stop”, Ubuntu should stop connecting, and all the controls should resume sensitivity, so that you can revise the connection details.
- Once Ubuntu has connected successfully:
- The spinner and “Connecting…” should change to a checkmark icon and the text “Connected”.
- The “Stop” button should become insensitive too.
- The dialog should close two seconds later.
Changing details for an existing connection
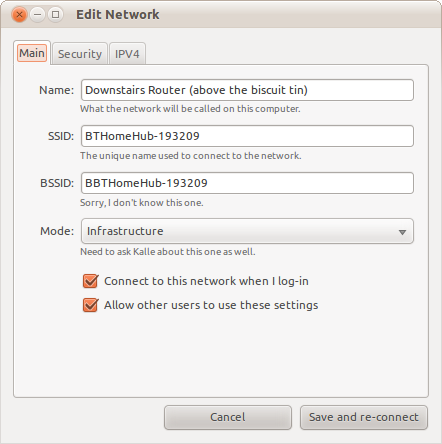
What do we need this dialog for?
<lapo> mpt, I think you can just kill the BSSID detail or gray it out in infrastructure mode (it would be the ap mac address, you cannot change it)
...
<lapo> mpt, basically it's something handled by the system, it cannot be changed, dunno why we have that option in the first place
When Ubuntu successfully connects to a wireless network, a notification bubble should appear with the icon of the connection, “Connected” as primary text, and the name of the network as secondary text.
Data
Settings for a wireless connection:
- Network (SSID)
- usually chosen from a list
- manually entered for a hidden network
- we can detect how many hidden networks are available
- Authentication method: None / WEP Open Key / WEP Shared Key / WPA / WPA2
- correctly auto-detected ~98% of the time (maybe hide it by default)
- password
- WEP key: exactly 5, 10, 13, or 26 characters
- WPA key
- minimum of 8 characters
? <=63 characters is Ascii
- ? 64 is hexadecimal
- optionally show the password in plaintext
- feedback on connection process
- with WEP, you have to wait for a long timeout to tell that the password was wrong
- with other security types, you can tell immediately
- IPv4 mode: DHCP (Renew DHCP Lease) or Manual
- network settings (with DHCP, all are automatic but overridable)
- Name servers (zero or more, but without one you can't use domain names)
- Domains (zero or more, e.g. "millbank")
- IPv4 address
- IPv4 netmask
- IPv4 gateway
- (IPv6: not implemented yet)
- what happens when there's a connection error?
- you enter the wrong password
- passphrase
- autoconnect
- enabled/disabled
- nameservers
- list of servers, in priority order
- if empty, automatic servers used
- domains
- list of domain names
- if empty, automatic domains used
- ipv4
- method:
- dhcp
- manual
- address
- netmask
- gateway
- off
- method:
- ipv6
- method:
- dhcp
- manual
- address
- netmask
- gateway
- off
- method:
- proxy
- method:
- direct
- auto
- url (if empty wpad is used)
- manual
- servers
- excludes
- method:
<lapo> mpt, android let you edit the networks you see and have an "out of reach" with the ones you cannot see
<lapo> mpt, automatic connection and stuff should be handled by a sane logic, I think an "automatically connect" check should really be skipped
<mpt> lapo, what do you mean by "edit" w.r.t. networks? Prioritize them?
<lapo> mpt, nope, it lets you edit the settings
* mclasen has quit (Ping timeout: 600 seconds)
<lapo> mpt, no prioritization, that is handled by the system, and it's ok like that
<lapo> mpt, why do you want to prioritize the wifi networks? Since the system picks the wrong one, I guess. Better to fix that w/o bugging the user
<mpt> lapo, ok, here's an example I have four times a year: I'm happy to use the hotel wi-fi, but I'd much rather use the "Ubuntu" network that our IS guys have set up, even if it's a bit weaker, because that doesn't make me go through a login Web page.
...
<lapo> mpt, if the last time you were there you picked the ubuntu one that is the one which should be picked
...
<mpt> lapo, no, quite often I have to alternate between the hotel wi-fi in the hotel room, and the conference wi-fi in the conference rooms
<lapo> mpt, you have, hence the system should remember what you did last time
<mpt> Exactly, I don't *want* it to remember what I did last time
<mpt> Well, I do, but I don't want it to do the same thing as it did last time, I want it to do the opposite.
...
<lapo> mpt, I think it's a lot more common for it to remember what you did last time
Connecting to wi-fi, in general
When Ubuntu tries to connect to a wi-fi network, in addition to the standard connection feedback:
If the network requires authentication details you haven’t provided before, a dialog should open for you to authenticate.
If you cancel authentication, the connection attempt should stop, and Ubuntu should resume its previous connection state — whether that was connected to another network, or to no network at all.
If connection is successful, on the PC a notification bubble should appear, with a wi-fi icon representing the signal strength, primary text “Connected”, and secondary text the SSID of the network.
TBD: Specify error handling.
Wired connections (PC only)
Connecting to a wired network, in general
When Ubuntu tries to connect to a wireless network, in addition to the standard connection feedback:
If connection is successful, a notification bubble should appear, with a wired icon, primary text “Connected”, and secondary text the connection name e.g. “Wired connection 2”.
Wired devices in the Network Settings window
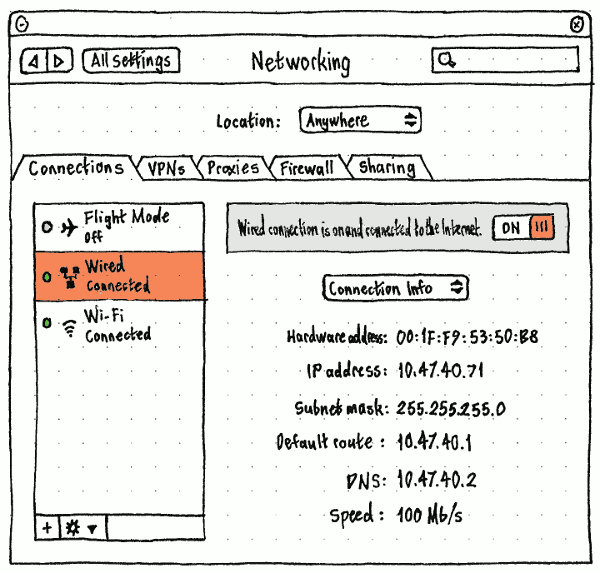
Wired section of the network status menu
|
If the computer has any Ethernet cards, the menu should begin with a wired section. This section should consist of a toggle item for each wireless card, where toggling the item controls both whether it is powered on and being used.
In the usual case where there is only one Ethernet card, its label should be simply “Wired Connection”. In the rare case where there is more than one Ethernet card, the label for each should be “Wired Connection N”, where N = the kernel ID for the card, e.g. “Wired Connection eth1”. If there is no link (e.g. the cable is unplugged), the item should be disabled but not hidden.
We may need to distinguish between {power off, power on but not connected, connected}.
Data
- autoconnect
- enabled/disabled
- nameservers
- list of servers, in priority order
- if empty, automatic servers used
- domains
- list of domain names
- if empty, automatic domains used
- ipv4
- method:
- dhcp
- manual
- address
- netmask
- gateway
- off
- method:
- ipv6
- method:
- dhcp
- manual
- address
- netmask
- gateway
- off
- method:
- proxy
- method:
- direct
- auto
- url (if empty wpad is used)
- manual
- servers
- excludes
- method:
Cellular connections
Cellular devices on PC
|
If any cellular devices are connected to a PC, or if it has any Bluetooth cards turned on, the network menu should have a cellular section. (We deliberately exclude from this menu the interface for turning Bluetooth as a whole on or off.)
The cellular section should begin with a “Cellular Setup…” item that opens the “Cellular Setup” window.
Following this, if a cellular device is connected or a Bluetooth modem is connected and configured, and any cellular connections have previously been configured, these connections should be listed as switch items. Toggling an item should connect or disconnect.
These are the parameters for mobile broadband connections:
- PIN for SIM card
- may prompt each time or optionally remember it
- 4~8 digits [3GPP TS 11.11 V8.14.0 (2007-06), 9.3 Definitions and coding]
- If you enter the wrong PIN 3 times, the SIM will lock you out
- the hardware may tell Ofono that a PIN isn't necessary
- APN (access point name)
- e.g. "INTERNET", "bam.entelpcs.cl"
hook into an existing database of APNs by country -> provider (-> plan)
- also allow manual typing
- maximum of 100 characters [3GPP TS 23.003 V9.2.0, 9.1 Structure of APN]
- autoconnect
- enabled/disabled
- apn
- nameservers
- list of servers, in priority order
- if empty, automatic servers used
- domains
- list of domain names
- if empty, automatic domains used
- ipv4
- method:
- fixed (user can't edit)
- method:
- ipv6
- method:
- fixed (user can't edit)
- method:
- proxy
- method:
- direct
- auto
- url (if empty wpad is used)
- manual
- servers
- excludes
- method:
Setting up a cellular connection, prompted
|
If, while you are logged in, you connect a cellular device to a PC, a “Cellular Connection” dialog should appear. If you disconnect the device, the dialog should close automatically.
The dialog’s primary text should be “You’ve connected a mobile device. Do you want to use it to connect to the Internet?” If the device requires a PIN, there should be a “Device PIN:” field, a “Show PIN” checkbox, and an “Authorize” button.
The “Device PIN:” field should be a password field whenever the “Show PIN” checkbox is unchecked, and a normal text field whenever “Show PIN” is checked. Entering any non-digit character, in any way, should produce an alert sound instead of accepting the character.
Test case: Check “Show PIN”. Copy these characters “1 2 3 4” to the clipboard. Paste them into the “Device PIN:” field. The field should contain “1234”.
The “Authorize” button should be the default button whenever the “Device PIN:” field is focused. It should be sensitive whenever the “Device PIN:” field contains from 4 to 8 digits inclusive.
All other controls in the dialog should initially be insensitive, except for the “Cancel” button.
|
Activating the “Authorize” button should make it insensitive, and make a spinner with the text “Authorizing…” appear at the trailing end of the dialog below the button, for as long as it is trying to authorize with the entered PIN.
If the PIN was incorrect, the primary text of the alert should change to: “The PIN was incorrect. If you enter an incorrect PIN too many times, the device SIM may become locked.” The PIN field should then be focused, and the “Authorize” button should resume sensitivity.
If the authorization succeeded, the “Device PIN:” field should also become insensitive, the “Authorize” button should become an “✔ Authorized” label, the access point controls should become sensitive, and “Connect” should become the default button.
The access point controls should begin with “Access point:” radio buttons: “Automatic” (the default) and “Manual”.
Whenever “Automatic” is selected, the radio buttons should be followed by “Region:” and “Provider:” option menus, populated by the Service Provider Database, and an “APN:” caption displaying the APN for the selected region and provider.
|
Whenever “Manual” is selected, the radio buttons should be followed by an “APN:” text field. This field should accept a maximum of 100 characters; entering any more should produce an alert sound instead of accepting them.
|
What other server/domain settings do we need?
The “Connect” button should be sensitive whenever either a provider is chosen from the “Provider:” menu, or if the “APN:” field is non-empty. Activating the button should make a spinner and the caption “Connecting…” appear in the bottom leading corner of the dialog, change the “Cancel” button to “Stop” (without changing its width), and desensitize the access point controls and the “Connect” button, while trying to connect.
If you activate “Stop”, the connection attempt should stop, the button should desensitize for two seconds (to ignore you if you double-clicked it by mistake), it should turn back into a sensitive “Cancel” button, and the access point controls and the “Connect” button should resume sensitivity.
Setting up or changing a mobile connection, unprompted
|
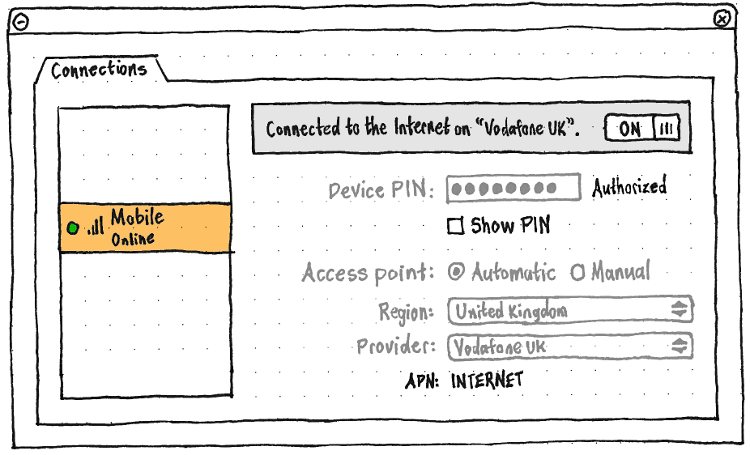
In the “Network Settings” window, the pane for a mobile device should consist of controls that look and behave identically as in the “Mobile Connection” dialog, except that:
- The top of the pane should be a status panel, with text of one of these forms:
- Not connected.
- ❊ Connecting…
Could not connect to {provider}. Can we be more specific?
- You’re connected to the Internet on {provider}.
- You’re connected to {provider}, but not on the Internet.
There should be no “Cancel” or “Connect” buttons. Instead, at the trailing end of the status panel, should be a switch that is sensitive if settings are sufficient to attempt a connection. The switch should be ON whenever the device is connected or attempting a connection, and OFF otherwise.
- All the controls, except the status panel and the “Show PIN” checkbox, should be insensitive whenever you are connected.
So, the process for setting up a mobile connection without using the dialog is:
- Open the Network Settings.
- Select the mobile device in the left pane.
- In the right pane, enter the device PIN and activate “Authorize”.
Once authorized, enter the access point details, and switch the connection ON.
And the process for changing a connected mobile connection is:
- Open the Network Settings.
- Select the mobile device in the left pane.
In the right pane, turn the switch OFF.
Change the access point details, then turn the switch back ON.
“Mobile Setup” window
So that you can easily connect to the Internet using a Bluetooth phone that you may not have paired yet, the “New Mobile Broadband Connection” window should be altered to provide easy access to pairing.
...
“Cellular” settings on phone
![]()
At the top level of System Settings, “Cellular” should be present only when the device contains cellular hardware (bug 1258210).
|
|
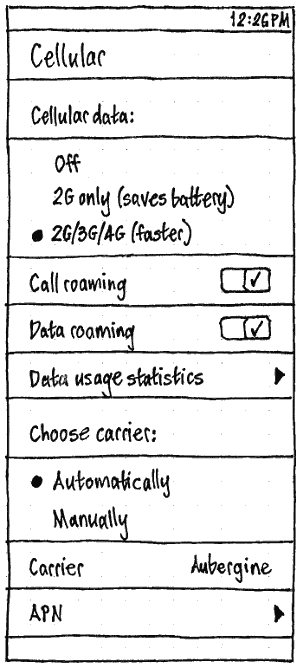
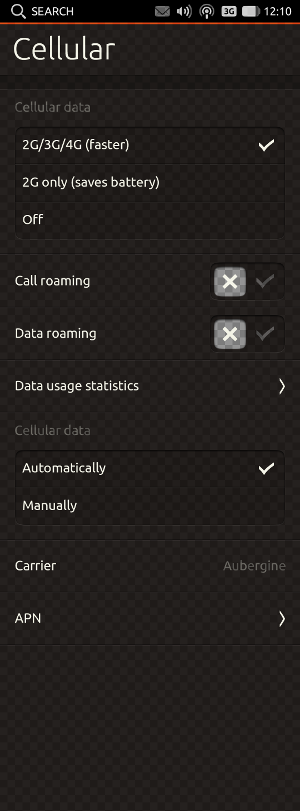
“Data roaming” should be both off and insensitive whenever “Cellular data:” is “Off”. When you turn “Cellular data:” to any other value, “Data roaming” should become sensitive and return to its previous value.
“Data usage“
|
|
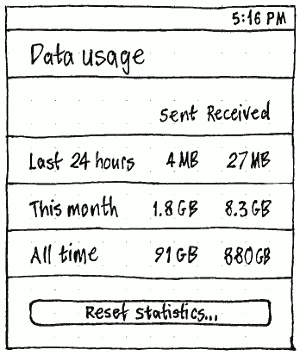
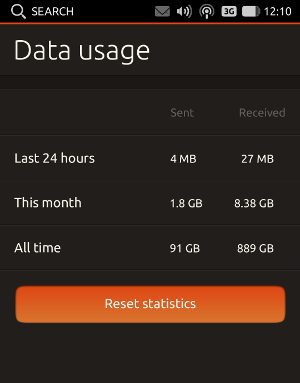
“Data usage statistics” should navigate to a “Data usage” screen. On this screen, “Reset Statistics…” should display an alert with the text “All data usage statistics will be set to zero.”, and “Reset” and “Cancel” buttons.
“Carrier”
When “Choose carrier:” is set to “Automatically”, the “Carrier” item below should be read-only text. When “Choose carrier:” is set to “Manually”, the “Carrier” item should be a stack item leading to a separate “Carrier” screen.
|
|
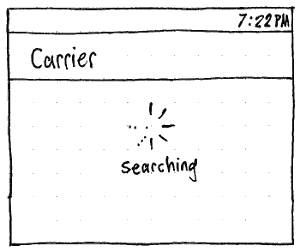
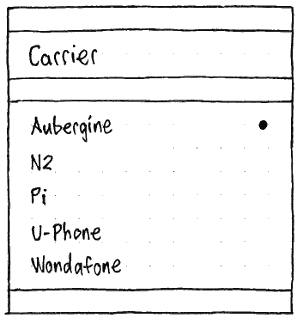
Whenever you visit it, the “Carrier” screen should initially contain a spinner and the caption “Searching”. These should be replaced by an alphabetical list of detected carriers. Should we show the signal strength of each?
When you choose a carrier, the radio mark preceding the previous carrier (if any) should be replaced by a spinner preceding the selected carrier (as in menu layout), and the amount of time the registration has taken so far should be shown at the trailing end in the form “M:SS”. When registration completes, that duration should disappear, and the current carrier should regain its radio mark. If registration failed, an alert should appear with the title “Error”, text “Registration failed. Try again later, or contact the carrier.”, and an “OK” button. If registration succeeded, you should navigate automatically back to the “Cellular” screen, where the new carrier name will appear.
“APN”
As long as Ubuntu can handle only one APN at a time, the “APN” screen should contain only one “APN”, one “User name”, and one “Password” field, and one “Protocol” menu containing options “IPv4”, “IPv6”, and “IPv4v6”.
Once Ubuntu can handle multiple APNs, the “APN” screen should begin with an “Internet APN” field and related controls, followed by an “MMS APN” field and related controls.
Bluetooth connections (PC only)
Things to expose:
- shouldn't need to enter anything after pairing Bluetooth device
- from iPhone, is triggered from the phone, then appears in Mac OS X as a wired connection
- connection type: PAN/DUN (usually automatic, occasionally wrong)
- PAN (Personal Area Networking) [some phones, e.g. iPhones]
- DUN (dial-up networking) [other phones] - not yet implemented
- manual settings
- IP address, DHCP, DNS (usually automatic)
Data
- autoconnect
- enabled/disabled
- nameservers
- list of servers, in priority order
- if empty, automatic servers used
- domains
- list of domain names
- if empty, automatic domains used
- ipv4
- method:
- dhcp
- manual
- address
- netmask
- gateway
- off
- method:
- ipv6
- method:
- dhcp
- manual
- address
- netmask
- gateway
- off
- method:
- proxy
- method:
- direct
- auto
- url (if empty wpad is used)
- manual
- servers
- excludes
- method:
To do
Settings to expose:
- Wireless
- Removing stored wireless networks
- Any combination of these can be used simultaneously
- One is the "main connection" (default route)
- sends and receives your Internet traffic ("You're connected to the Internet using this connection")
- affects your IP address
- shown in the menu title
- drag and drop -- top one in a list is the default route?
- Do we want to convey it inside the menu too?
- others are only for local network
- One is the "main connection" (default route)
- DNS
- usually the same regardless of connection
- often automatic, from DHCP lease
- sometimes automatic from PPP
Property |
Description |
Data constraints |
mode |
ethernet |
wifi |
bluetooth |
cellular |
State |
State of connection |
|
r |
X |
X |
X |
X |
Error |
Last error reason |
|
r |
X |
X |
X |
X |
Name |
Name of connection |
|
r |
X |
X |
X |
X |
Type |
"ethernet, wifi, cellular etc" |
|
r |
X |
X |
X |
X |
Mode |
|
|
r |
- |
X |
- |
X |
Security |
|
|
r |
- |
X |
- |
- |
Passphrase |
|
|
rw |
- |
X |
- |
- |
PassphraseRequired |
|
|
r |
- |
X |
- |
- |
Strength |
|
|
r |
- |
X |
X |
X |
Favorite |
internal only |
|
r |
X |
X |
X |
X |
Immutable |
|
|
r |
X |
X |
X |
X |
AutoConnect |
|
|
rw |
X |
X |
X |
X |
SetupRequired |
|
|
r |
- |
- |
- |
X |
APN |
3G Access Point Name |
max. 100 characters [3GPP TS 23.003 V9.2.0, 9.1 Structure of APN] |
rw |
- |
- |
- |
X |
MCC |
don’t show at all |
|
r |
- |
- |
- |
X |
MNC |
don’t show at all |
|
r |
- |
- |
- |
X |
Roaming |
|
|
r |
- |
- |
- |
X |
Nameservers |
don’t show |
|
r |
X |
X |
X |
X |
Nameservers.Configuration |
|
|
rw |
X |
X |
X |
X |
Domains |
don’t show |
|
r |
X |
X |
X |
X |
Domains.Configuration |
|
|
rw |
X |
X |
X |
X |
IPv4 |
for troubleshooting |
|
r |
X |
X |
X |
X |
IPv4.Configuration |
|
|
rw |
X |
X |
X |
- |
Proxy |
|
|
r |
X |
X |
X |
X |
Ethernet (MAC address) |
|
|
r |
X |
X |
X |
X |
Legend: |
X = available |
- = unavailable |
Spec: http://git.kernel.org/?<p=network/connman/connman.git;a=blob;f=doc/service-api.txt;hb=HEAD
VPNs
VPN section of the network status menu
|
The VPN section should be present whenever at least one VPN is set up. The section should begin with a “VPN Setup…” item that opens the Network Settings window to the VPNs tab.
Following that item, the configured VPNs should be listed as toggle items. Toggling an item should connect or disconnect from that VPN.
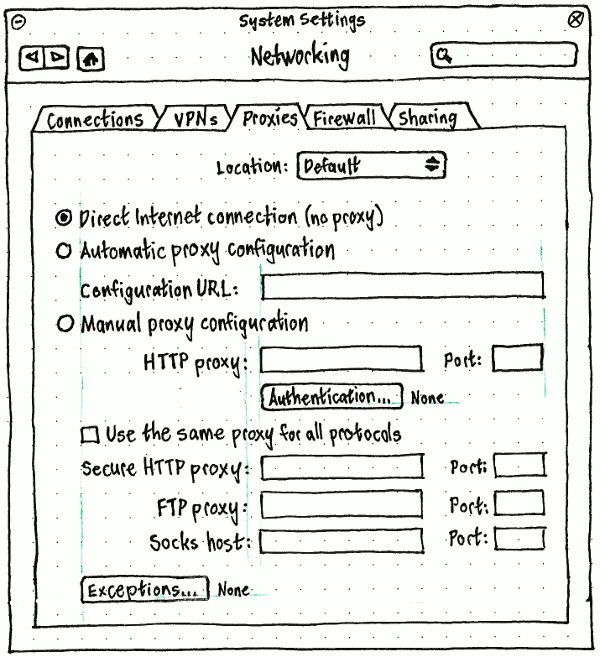
Proxies
Firewall (PC only)
See also Oneiric desktop networking enhancements.
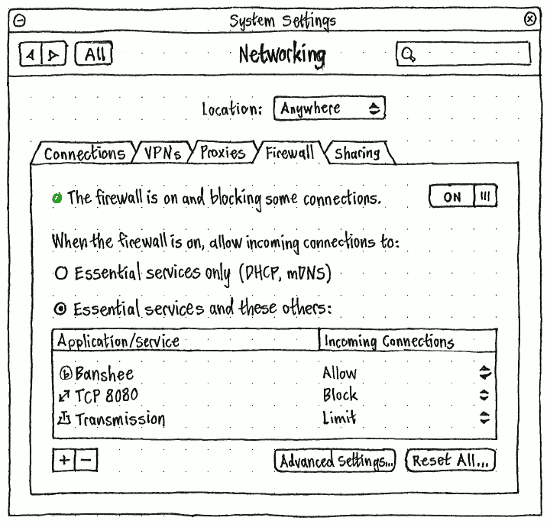
The “Firewall” panel should start with status in one of these forms:
Status light |
Status text |
Switch |
grey |
The firewall is off. |
OFF |
yellow |
The firewall is starting up… |
ON |
red |
The firewall is not blocking any connections. |
ON |
green |
The firewall is on and blocking all non-essential connections. |
ON |
green |
The firewall is on and blocking some connections. |
ON |
green |
The firewall is on with custom settings. |
ON |
yellow |
The firewall is shutting down… |
OFF |
If “The firewall is on with custom settings” (for example, it is blocking any outgoing connections at all), all other controls in the panel should be insensitive, except for the “Advanced Settings…” and “Reset All…” buttons.
The list of applications should be sensitive only when “When the firewall is on, allow incoming connections to:” is set to “Essential services and these others:”.
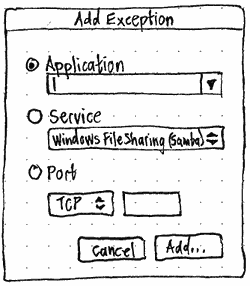
If you choose “+” (which should have the accessible label “Add an Exception”), an “Add Exception” dialog should appear giving you the option of adding an application, service, or port.
Choosing “Advanced Settings…” should open a text editor to the ufw configuration file. Choosing “Reset All…” should open a confirmation alert of the form “Are you sure you want to delete all custom firewall settings?”. If you choose “Delete”, the ufw configuration file should be deleted and settings return to the “Essential services only” defaults.
Sharing
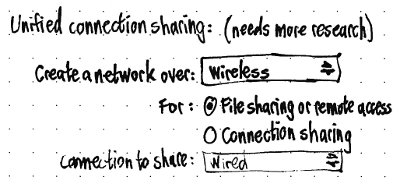
So you can easily share your connection regardless of whether it is wired, wireless, or mobile, there should be a single “Create/Share Connection” window.
PC-specific designs (to be integrated above)
Ubuntu’s networking interface should consist mostly of a “Network” panel in System Settings to cover networking in general, including connection setup, VPN, proxy, and firewall settings; and a network menu for quick access to connection settings.
Some of this interface is implemented in indicator-network on top of Connection Manager (a.k.a. ConnMan). The interface could also be implemented on top of Network Manager.
Artwork requirements
Wireless connection icons

 (off, 0%, 20%, 50%, 75%, 100%)
 Wired connection icons

 (off, on)
 Computer-to-computer network icon

- Padlock icon for encrypted networks
- Colored light icons for “connected”, “on but not connected”, and “off” (these are drawn dynamically using cairo and so are not needed as files)
- Flight mode icon
Future work
- Following the general principle that people open this menu for the purpose of fixing something wrong with their network connection, we should include, in the menu, items for turning off background tasks (such as Ubuntu One file syncing, or torrent seeding) that are consuming lots of bandwidth.
Locations
Above the tabs in the settings panel should be a “Location:” menu with a radio item for each location profile, followed by a separator and items ‘New Location…’, ‘Rename “{name of current location}”…’, and ‘Delete “{name of current location}”…’. By default, there should be only one location, “Anywhere”; when it is selected, the “Rename” and “Delete” items should be insensitive.
Optional extra: At the bottom of the “Location:” menu should be another separator, and finally a “Location Menu in Menu Bar” checkmark item. When it is checked, a location menu should appear in the menu bar, immediately on the leading side of the networking menu (or if the networking menu is turned off, immediately on the leading side of where it would be). This menu should have a globe icon as its title, and should contain a radio item for each location profile, followed by a separator and a “Network Settings…” item that opens the Network panel of System Settings.
Whichever way it is selected, choosing a location should change all networking settings to those that were last configured in that location.
Creating a location
Choosing “New Location…” should open a “New Location” dialog containing:
a “Choose a name for the new location:” field that, if possible, is pre-filled with the GeoName nearest your current location;
- a “Based on:” menu listing the existing locations, with “Anywhere” as the default;
- “Cancel” and “Create” buttons.
The “Create” button should be insensitive whenever the current value of the “Choose a name for the new location:” field is identical to one of the existing locations.
When a new location is created, it should start out with the same settings as whichever location it was “Based on”.
Renaming a location
Choosing ‘Rename “{name of current location}”…’ should open a “Rename Location” dialog, containing only a ‘Choose a new name for “{name of current location}”:’ field (pre-filled with the existing name), and “Cancel” and “Rename” buttons.
The “Rename” button should be insensitive whenever the current value of the “Choose a name for the new location:” field is identical to one of the other existing locations.
Deleting a location
Choosing ‘Delete “{name of current location}”…’ should open a confirmation alert with primary text ‘Are you sure you want to delete “{name of current location}” and all its settings?’, secondary text “You last used this location on {date}”, and “Cancel” and “Delete” buttons.
Unresolved issues
- We need a thorough test suite for which wireless networks are shown in the menu.
- When showing networks in the menu, prioritize open networks.
Compare with OpenSolaris equivalent: http://hub.opensolaris.org/bin/view/Project%20nwam/Phase1
- How is shown that Wired connection is ready (cable plugged in, DHCP settings received) compared to case that cable isn't plugged in or DHCP hasn't answered? Should the ON/OFF switch reflect the state or is it only for user controlling the power of that device? The question also applies to 3G.
- How to handle network updates while menu is open? In some cases networks might change a lot.
- What about usb connections (e.g. USB tethering with a cellphone or USB ethernet modems? They show up as "wired connections" or "generated ethernet connections" atm, what they might not be.
settings:
- edit connections functionality based on the connections property table, for all connection types
- connman doesn't support "last used" property, at least not yet
- how to show which wifi connection is connected? should we also show connecting states?
- how to disconnect connections from settings window?
- need to show which connections are saved or have details (connman's term is favorite). "Forget Details" button will remove the settings stored for these connections.
- wired settings window missing from the spec
- there should be a separate dialog for mobile PIN
icons:
- what icon to use as indicator icon in the panel when bluetooth connection is the default connection, otherwise there are two bluetooth icons on the panel (bluetooth and indicator-network)
- icon animation for each technology? (wired, wireless, mobile, bluetooth)
- strength icons for mobile and bluetooth as well
mobile wizard:
- when user plugs in a new modem, in some cases, we can automatically detect APN, but should we always ask for confirmation from the user?
- if we can't detect APN automatically, we need to ask from the user by showing a country/provider. how to show that?
dialogs:
- passphrase dialog
- PIN dialog
other:
- connection information dialog
- IP settings
- statistics
- hardware information?
- driver name
- modem name and info
- driver, firmware, hw versions
Networking (last edited 2016-07-17 14:48:38 by mpt)
