Installation
Installing Ubuntu on the Nexus7 |
This project is no longer maintained. You might be interested in Ubuntu Touch though. |
Setting up your Nexus 7
Contents |
Please note as of 12/7/2012 we strongly urge users to re-flash to Raring 13.04
What you will need
- Nexus 7 Tablet (8GB, 16GB, or 32GB)
- Standard MicroUSB Cable (should come with the device)
- Ubuntu Nexus 7 Desktop Installer installed on your development system
- (Version 1.7 now supports 13.04)
- Ubuntu 12.04 LTS or Later
 This is a developer preview image, not intended for general users.
Optional
Micro USB Host Cable (OTG Cable) - used for attaching keyboard, mouse, etc. Directions on how to get and use one of these are towards the bottom of the page at https://wiki.ubuntu.com/Nexus7/UsingTheDevice
Ubuntu Nexus 7 Desktop Installer
A simple graphical installer has been provided, and is available in a PPA. The installer has been updated to 1.7 to now support 13.04
sudo add-apt-repository ppa:ubuntu-nexus7/ubuntu-nexus7-installer
sudo apt-get update
sudo apt-get install ubuntu-nexus7-installer
Usage instructions for the installer are provided below.
Unlocking the Nexus 7
The Nexus 7 ships with a locked bootloader. You must unlock it in order to flash different images to the device. Fortunately, this is a trivial process, and you only need to do it once.
![]() Warning: Unlocking the bootloader erases all data and resets the device to factory defaults.
Warning: Unlocking the bootloader erases all data and resets the device to factory defaults. ![]()
- Reboot the Android device into the Android boot loader. To do this, first power down the device in the normal fashion (hold down the power button, then select power off and wait a few seconds). From the off state, hold the volume down button and press the power button. Continue holding the volume down and power buttons until you see the boot loader UI.
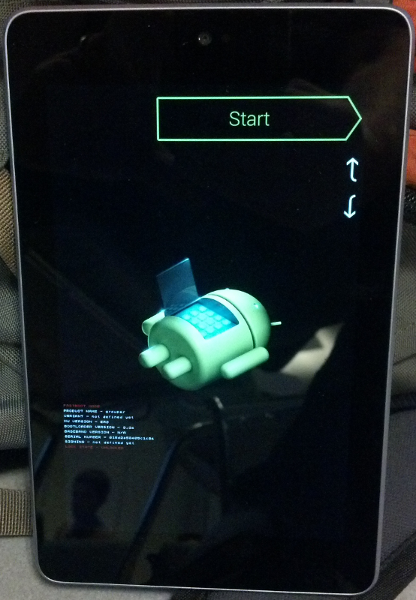
- Plug in the device to your laptop with your micro-usb cable The device now displays the boot loader GUI, which looks like this:

Verify fastboot lists the device. In a terminal on your laptop, run:
 * $ sudo fastboot devices
1234567891234567        fastboot
- Start the bootloader unlock process:
sudo fastboot oem unlock
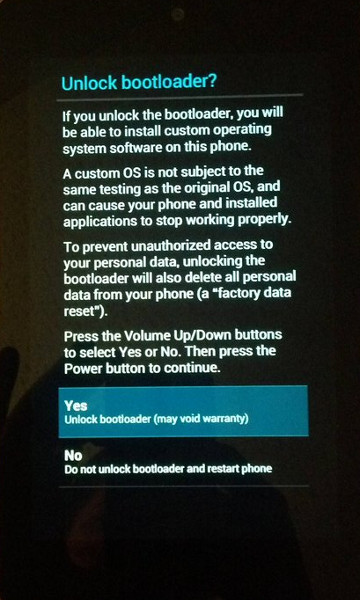
- You are prompted on screen to unlock the bootloader on the Android device screen. Follow the on-screen directions to continue. Your screen should now look like this:

Complete the process by rebooting:
sudo fastboot reboot-bootloader
Or simply press the power button.
When the device reboots back into the bootloader (fastboot mode), you should see "LOCK STATE - UNLOCKED" in small red print. At this point your device is now unlocked.
Installing Ubuntu 13.04 on Nexus 7
Once all setup has been completed, the installation can start. To install, ensure the Nexus 7 is in fastboot mode, plug it into your computer (and make sure NO OTHER DEVICES are plugged in).
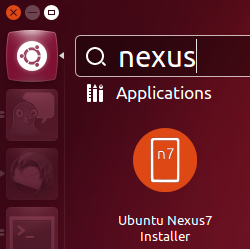
Find the installer in the dash (search for 'nexus'): 
This will provide a Graphical Interface for installing Ubuntu. This tool will download the latest image automatically, and flash it accordingly. The flashing step should take about 2 minutes. Once the flashing is complete, the device will reboot and finish the installation. This step can take 10-15 minutes.
Manually Installing Ubuntu 13.04 on Nexus 7
The following instructions are for manually installing Ubuntu 13.04 on the Nexus 7. Please refer to the Known Issues Page prior to flashing.
Be sure to have the ubuntu-nexus7-installer package installed so that all of the necessary prerequistes are pulled on your system.
Download the two Raring daily build files (.bootimg & img.gz) from: http://cdimage.ubuntu.com/daily-preinstalled/current/
- gunzip the img.gz
- Attach the nexus in flash mode
- Verify that the Nexus7 is identified properly via fastboot
- Issue the following:
$sudo fastboot erase boot

erasing 'boot'...
OKAY [  0.027s]
finished. total time: 0.027s
$sudo fastboot erase userdata
erasing 'userdata'...
OKAY [  1.077s]
finished. total time: 1.077s
$sudo fastboot flash boot /path/to/*.bootimg*
sending 'boot' (8192 KB)...
OKAY [  1.055s]
writing 'boot'...
OKAY [  0.280s]
finished. total time: 1.336s
$sudo fastboot flash userdata /path/to/unzipped/*.img
sending 'userdata' (679937 KB)...
OKAY [ 87.024s]
writing 'userdata'...
OKAY [ 30.850s]
finished. total time: 117.875s
$sudo fastboot reboot
rebooting...

finished. total time: 0.020s
* The tablet will now reboot and boot into the Ubuntu installer.
First boot
During first boot, the initial configuration will begin. You will be prompted to connect your device to a local Wifi Network followed by the time zone, keyboard layout, user name & password, system name and some additional options. After all of these steps have been completed the user will be presented with the desktop.
Do not worry about a messed up desktop background during the configuration/installation, as soon as your final desktop gets started, you get a correct background.
In some cases the onscreen keyboard does not work. It displays but the characters typed do not appear in the input fields. To go on, connect a PC keyboard (USB wired or non-Bluetooth 2.4 GHz wireless with USB dongle) with an OTG adapter cable. After the installation the onscreen keyboard will work and you can also configure Bluetooth keyboards.
Having both Android and Ubuntu installed for dual boot
If you want to try Ubuntu but not lose your Android, you can use a dual-boot setup. There is a working solution for Ubuntu 13.04 on the XDA mobile developer forum. You need at least version 7 of MultiROM and the corresponding Recovery version. Also make sure that after installing the Ubuntu image that you go into the ROM list, click your new Ubuntu entry, and in the menu appearing then disable flash-kernel, otherwise Ubuntu updates would overwrite the boot sector. See also bug 1078391.
Returning your Nexus 7 to Stock Android
![]() Warning: Disconnect ALL other mobile devices connected from your computer or they might get erased too. This will erase ALL DATA on your Nexus 7.
Warning: Disconnect ALL other mobile devices connected from your computer or they might get erased too. This will erase ALL DATA on your Nexus 7. ![]()
In case anything happens while developing, the system image for Nexus 7 can be found here: https://dl.google.com/dl/android/aosp/nakasi-jdq39-factory-c317339e.tgz
Please also check for updated Nexus7 (nakasi) factory images as well.
After downloading the above tarball, uncompress it with the following:
tar zxvf nakasi-jdq39-factory-c317339e.tgz
Then, place your machine into fastboot mode and run the resulting script:
cd nakasi-jdq39/
sudo ./flash-all.sh
You may get the following warnings, which you can ignore, the restoration will continue anyway.
archive does not contain 'boot.sig'
archive does not contain 'recovery.sig'
archive does not contain 'system.sig'
Then you may lock the device again after another reboot into the fastboot mode:
sudo fastboot oem lock
Troubleshooting the Install
If you have problems installing the image, please use the following troubleshooting steps:
- Detach the USB cable, restart the tablet back into fastboot mode, and re-attach the USB cable.
- If problems persist, reboot your host PC.
- If you still have issues, try a different USB cable.
- If you have a 16G tablet, try using the 8G image.
- If you still have issues after doing all this, return the image to stock using the directions above and re-try.
If none of that works, ask a question on Ask Ubuntu using the mobile tag, or ask for help in the #ubuntu-arm channel on freenode. If you believe it's a bug, file a bug against ubuntu-nexus7 in Launchpad.
Nexus7/Installation (last edited 2013-06-30 07:18:10 by 203-219-215-14)