InstallUbuntuEdgy
Glossary: |
Installing Ubuntu Edgy 6.10 On PC
Note: This guide presumes that you have already burned your Ubuntu LiveCD (The Default CD for download), that you have checked your PC meets the minimum system requirements (If you are running Windows XP, you meet them, you just need to check you have enough free hard disk space.), and that you have checked that you have burned your CD properly (it has files and folders, not one file). All of this will be in another Guide. It is a good idea to defragment your hard drive several times, before this tutorial, to be on the safe side.
If you have decided to switch to Linux, and have decided you want to try Ubuntu, but don't know how, this is the guide for you. Once you have downloaded and burned the LiveCD, restart your PC, with the disk in your CD/DVD drive. If you don't see this screen:
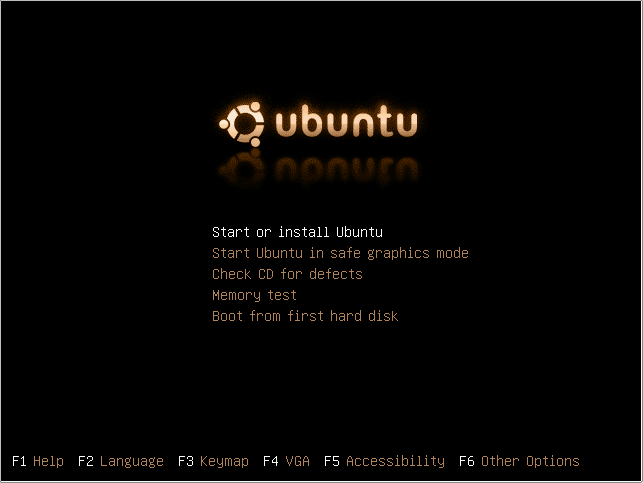
But instead see your usual windows loading screen, you need to change some options in your BIOS. If at this point, you are hesitant to make the switch, don't be.
BIOS stands for Basic Input Output System. It is a small chip in your PC, that makes basic decisions, like which order to boot your PC. On most PCs It is set to Floppy Drive, Hard Drive, CD-ROM Drive. Most PCs now, don't have floppy drives, so the boot order is the same without 'Floppy Drive'. If you have an additional CD/DVD drive this may also be on the list. The Reason you don't see the screen above, is that it is checking your Hard Drive for an operating system first. When it sees windows, it boots that, and aborts searching for any other bootable devices.
To change your boot order, you need to know how to get into your BIOS Settings. This is usually achieved by hitting (not literally) F1, F2, Esc, Del or F10. When you turn your PC on you will see a message saying press <key> to enter setup. If it goes to fast, press the Pause/Break key when it is displayed. Restart your PC when you know what it is and hit that key. Note: If you still don't know how to get into the BIOS contact your manufacturer, or search for 'Enter BIOS' on google for some excellent guides.
Note: You can't use your mouse in the BIOS!!! In the BIOS you need to look for an option called 'Boot configuration' or similar. To navigate around the BIOS, use your arrow keys and enter to select. To go back, hit Esc. The options you need to change will be something like:
Boot Device 1: Floppy
Boot Device 2: HDD
Boot Device 3: CD ROM
Use the arrows to select HDD (Abbreviation for Hard drive) hit enter and select CD. Make sure Boot device 3 has been changed to HDD. When you are done, hit Esc, to get back to the main menu, then read the top/bottom of the screen and look for what to press to 'Save Configuration and Exit'. WARNING: If you think you have changed any options that are not relevant to this, use Esc to exit without changing, and start again. WARNING2: Do Not change any options, that you think would be worth changing. You can make your PC unusable.
You should now be able to see the above screen when you turn on your PC. First of all, (using the arrows again) 'Check CD for defects'. This will check for any problems on the CD, to make sure you have no problems. If it gives an error, you will need to re-burn your disk, possibly at a slower speed. It should than restart your PC, and bring up the same screen again. This time select 'Start or install Ubuntu'. After a quick loading bar and some text, you should see a nice Ubuntu logo, and this loading bar:

This loading bar will be your friend for the next few minutes. You now have two options, sit and stare, enchanted by the gentle rocking, or get a cup of tea and a biscuit: It's not going anywhere for a while.
Once it finally decides to load (hopefully it won't take long) you will be presented with the default Ubuntu desktop, a lovely shade of brown. I didn't want to waste a screenshot, so here it is:
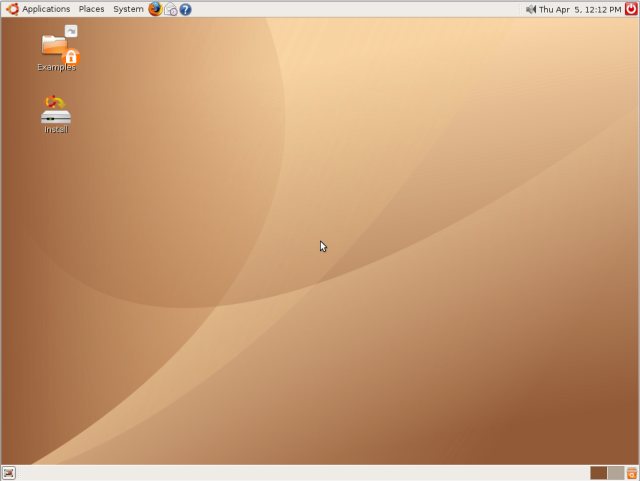
You may now think 'Well that was easy! I don't know what all the fuss is about'. I should probably point out now, that your install CD doubles as a live CD. A live CD lets you run the operating system from the CD, rather than installing it. If you click the menu options, you can choose from a selection of programs including:
Firefox – An Open Source internet browser, which is the second most used
OpenOffice – A full Open Source office suite – backwards compatible with Microsoft Office
The GIMP – An Open Source image editor, with many of the capabilities of Adobe Photoshop
GAIM – An Open Source multi-protocol instant messaging client
To name just a few. It also includes a selection of games for your enjoyment. Here is a screenshot of Firefox:
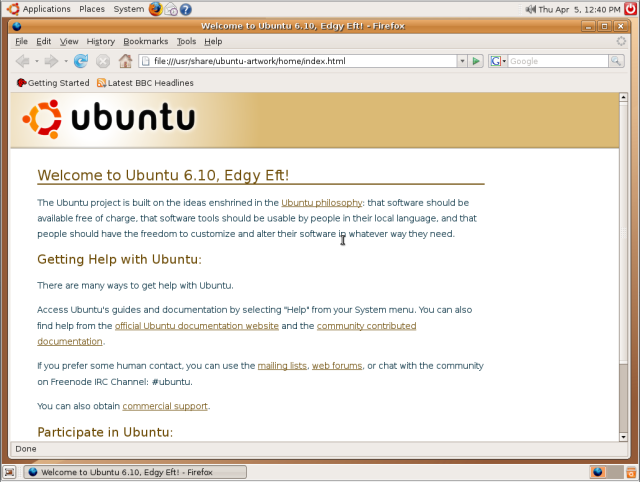
At this point, there are a few things that you might want to check. Is the internet working? Is your network (if you have one) working? Is sound working? Are your peripherals working? (Printer, Scanner, Web cam etc.) If there are quite a lot of things not working – try a different Linux distribution, as setting up all of it could be a pain. If a couple of things don't work, don't worry, as they will be easy to setup. If you get stuck, you can always ask in the wonderful forums at ubuntuforums.org.
If you are ready, you can now start to install Ubuntu to your PC. Simply double click on the install button on the desktop.
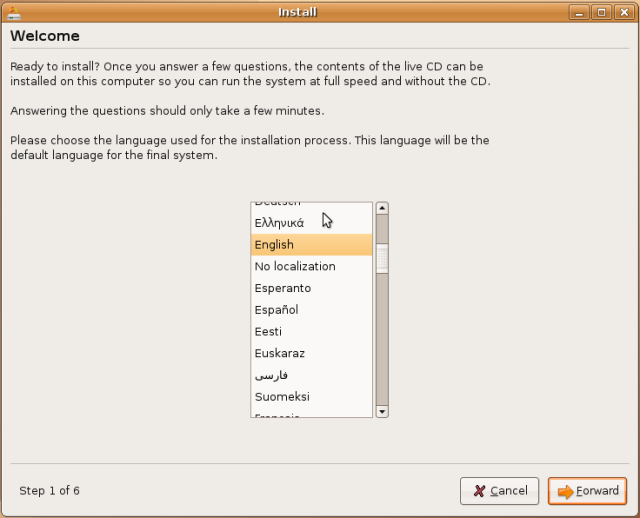
The installer will ask for your preferred language, which you select from the list. Once you have selected your language, click forward.
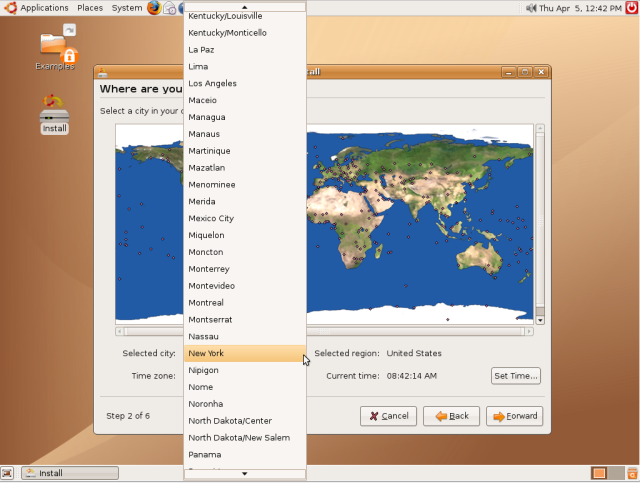
You can now select where you live, so Ubuntu can set the time accordingly. You can click your country on the map to select your time zone, or you can select it from a list. Check the time is right (if not change it), then click forward.
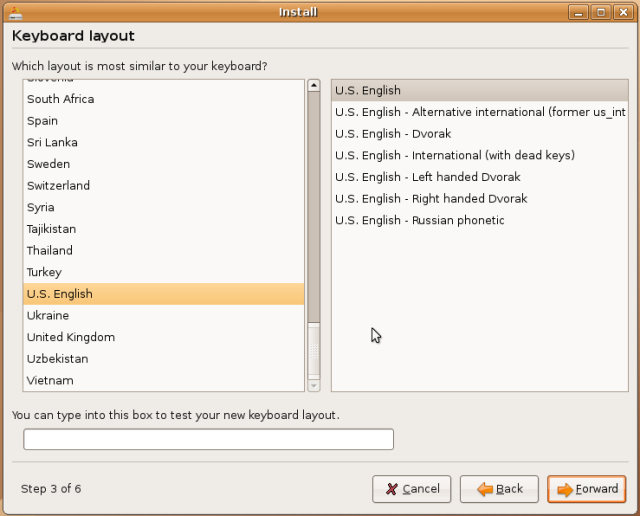
The installer will now ask for your keyboard layout, so that the keys you press will be the ones on the screen. Your keyboard will usually be linked with the country you live in. You can type in the box, to make sure that you have selected the right layout. The main keys you may have problems with are @ and “. If they are switched, you have selected the wrong keyboard type.
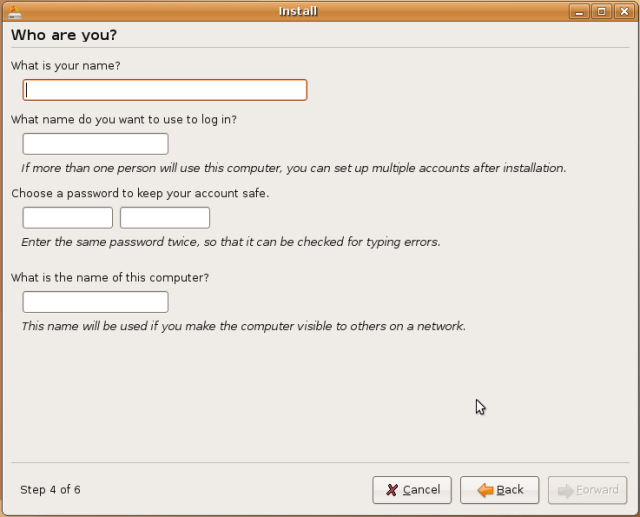
The installer will now ask some personal questions, to save you typing in your name for every program, to save you the effort later. It also asks for a username and password, which you will use to logon later Do Not Lose These! You will be able to set it up so it automatically logs you on, not recommended for safety, later. You can also choose a new computer name, or leave the default. When you are done, click forward.
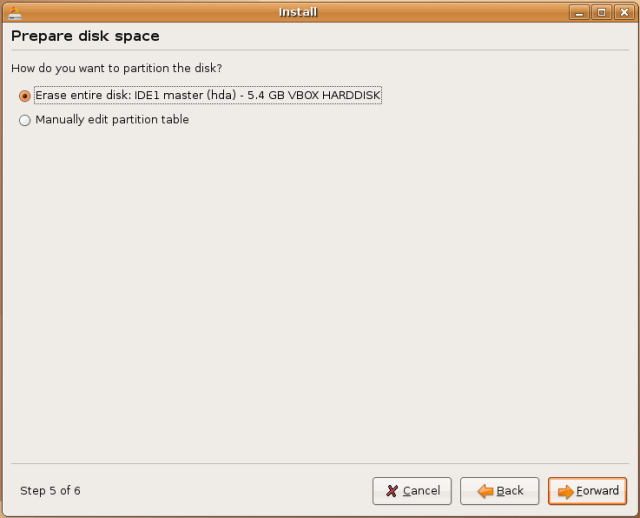
This is the hard part. You must partition your hard drive so that you can multi boot with windows – choose at start up. I did not have a windows partition, so I just chose 'erase entire disk'. You should not do this. You should choose the 'resize partition', and adjust the slider to the size you want. If you are not sure, leave it as is.
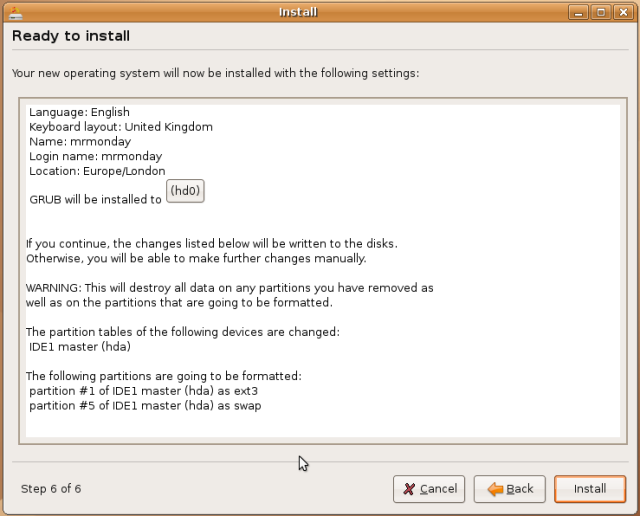
The installer will now display a summary of what it wants to do, so you can go back and change any options if necessary. If you are ready, click install.
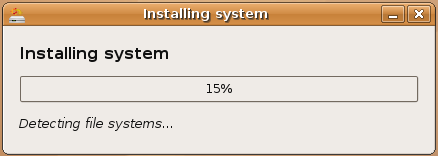
That's it! The installer will now install Ubuntu for you. You can minimise the installer if you want, and browse the internet or try some other software or games, I recommend you at least wait until the partitioning is done to do this, as you don't want there to be any messing up with that.
When the install has finished, you will see this message:
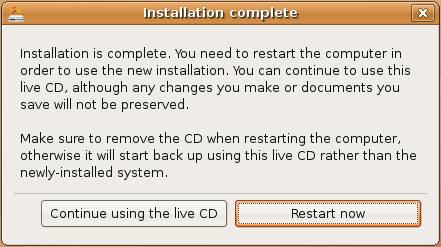
You can choose to restart or continue using the live CD. If you choose to continue using the live CD, you can press the red power button in the top right. Once you have clicked restart, you will see an unloading bar, then a message to remove your CD, do this, and press enter. Your computer will restart, and you will notice it loads a lot faster this time. Press enter if it gives yo a list of operating systems to boot from, then once it has loaded, you will see this screen:
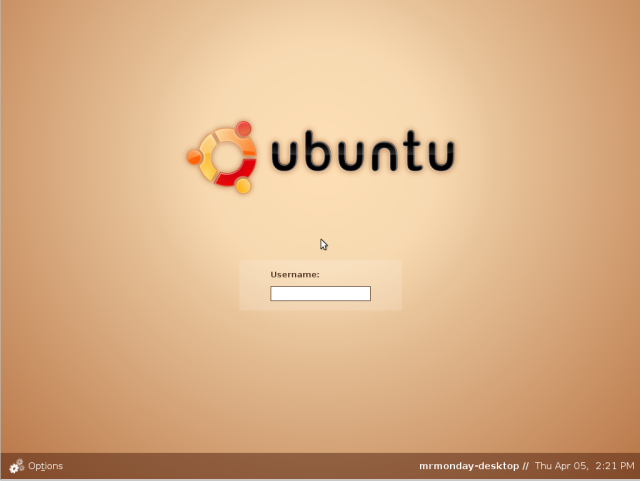
Enter your username, press enter, then enter your password and press enter. you will probably (after a few seconds) see this message:

Click the star, then 'Install updates' Most of these will be security updates, or extra features for software. It will ask you for your password, so that it knows that you want to install them, then will download and install them. It will also probably ask for a restart (It does not normally do this, just every now and again). Restart, and you will have Ubuntu installed and updated! You should now check that windows still works (it will probably come up with a message saying it needs to check for errors – this is because it thinks its hard drive has mysteriously shrunk, so its checking nothings wrong), by pressing the down arrow, and selecting windows.
Troubleshooting
If you have any problems ask at ubuntuforums.org, where a huge community is there to help you, 24/7.
By Robert Clipsham AKA Mrmonday
Comments
Feel free to put your comments here ![]()
From ookooboontoo I liked the write up, A couple of suggestions;
-"This guide presumes that you have already burned your Ubuntu CD," your guide is based on the LiveCD and this needs to be pointed out. Hopefully soon, someone may write a guide on the additional properties of installing from an alternate CD.
-"(Mainly free space, if you are running XP your PC is more than fast enough)" this comment is dificult to understand. I am guessing you mean the amount of free-space on your hard drive, and that the computer's CPU/system is fast enough to run the live CD and install it?
-"If you have decided to switch to Linux, and have decided you want to try Ubuntu, but don't know how, this is the guide for you. Once you have downloaded and burned the CD, restart your PC," I think you mean "downloaded and burned the LiveCD"
-"with the disk in" I am sorry to be pedantic, but it may better to say "with the disk inserted in the CD/DVD drive"
-Perhaps LiveCD and Alternate CD should go in the Glossary
- The images you have are quite wide and should be reduced for any publication otherwise readers with an 800x600 screen will struggle.
-Secondly with the images, whilst the first and last may be useful to have the desktop in the background, for all the others this just increases the file size of each image by quite a considerable amount. Cropping them to just show the active install windows will help enormously on the final magazine size.- I cropped all of them, I didn't see this point when I did it.
-You state to defrag your hard disk, I am not sure if there are defrag tools on the liveCD? and the second question (and I don't know the answer); Is it necessary to defrag if you are making a complete one system on the computer? I know you must defrag if making a dual boot, but not sure if it is the only install. I know you also need a second drive space for the swap and I wondered if that was the reason for the defrag?
-"Is your network (if you have one) working?" This statement is fine if you have a network. Most of us techies do with routers, but many have dsl modems to configure so I wonder if this needs mentioning, and later when you suggest using Firefox, they may not instantly get the internet without entering ISP information.
-"If there is quite a lot of things not working – try a different Linux distribution, as setting up all of it could be a pain." Perhaps it is better to say that compatibility issues may prove difficult. Otherwise you are not really promoting 'buntu and perhaps they would find the same whatever distro they had.
-"You must partition your hard drive so that you can multi boot with windows – choose at start up." We have not set up that this is a multi boot install, but we will need to show how to do both. If multi-booting we must emphasise the need to backup all windows data an a separate storage than the hard disk they wish to install Ubuntu on. PCW mag did a piece on multi-booting, I will try to seek it out for you. The decision to multi-boot or single boot perhaps should be posed at the beginning of the article.
-"Restart, and you will have Ubuntu installed and updated!" At this point a short description of GRUB may be useful as there are normally about 5 items to choose from on a first multi-boot list, more if additional desktops or version upgrades are made.
Sorry the list is long. Its a great piece though, and I hope my comments are all seen as positive amendments, not criticism. I have made a couple of spelling and grammatical errors within the wiki, but I wanted to display these for Mrmonday so that you can see if you agree.
Changed the images, bit blurry now. I will put Things in bold once they are done. - Mrmonday
UbuntuMagazine/InstallOfTheMonth/InstallUbuntuEdgy (last edited 2008-08-06 16:37:56 by localhost)