iso2usb
|
Size: 431
Comment:
|
Size: 4822
Comment: added that cloning works not only to a USB pendrive but also to a memory card, HDD and SSD.
|
| Deletions are marked like this. | Additions are marked like this. |
| Line 1: | Line 1: |
| = Win32DiskImager makes an Ubuntu family USB boot file in Windows = | ||<tablestyle="float:right; font-size: 0.9em; width:40%; background:#F1F1ED; margin: 0 0 1em 1em;" style="padding:0.5em;"><<TableOfContents(2)>>|| |
| Line 3: | Line 3: |
| This page is under construction. A crude version with screenshots will be published very soon, because it is needed ... | [[../|Return to the main Win32DiskImager page]] ----- |
| Line 5: | Line 6: |
| It is possible and easy to copy/flash/clone an ISO file to a mass storage device, typically a USB pendrive. The method under the hood is the same as is described in the wiki page about [[https://help.ubuntu.com/community/mkusb|mkusb]]. | = Win32DiskImager makes an Ubuntu family USB boot drive in Windows = == Introduction == A version with screenshots is published now, because it is needed ... ||<#CCFF99>[This is the situation now with the Ubuntu 14.04 LTS, 15.04 and 15.10 versions] '''!Win32DiskImager''' is particularly good for pre-release testing and new releases, when the standard tools like Unetbootin might not be ready (if the configuration of the booting has been changed since the previous release). || It is possible and easy to copy/flash/clone an ISO file to a mass storage device, typically a USB pendrive. It works the same way with a memory card or an [[https://askubuntu.com/questions/501187/installing-ubuntu-from-an-external-hard-drive/921777#921777|external hard disk drive or SSD]]. The method under the hood is the same as is described in the wiki page about [[https://help.ubuntu.com/community/mkusb|mkusb]]. This method works in Windows XP, Windows 8 and Windows Technical Preview (alias 'Windows 10'). I have not tested in Vista and Windows 7, but I am almost 100% sure that it works in those versions too. The following screenshots were made in Windows Technical Preview. == Graphical user interface tools in Windows == === Download an Ubuntu ISO file === Download an ISO file with standard Ubuntu or one of the many Ubuntu flavours, Kubuntu, Lubuntu, Xubuntu, Ubuntu Gnome ... using your web browser or download a torrent file and get the iso file faster that way. === Download and install Win32DiskImager and md5summer === Download the following help programs [[http://www.md5summer.org]] [[http://sourceforge.net/projects/win32diskimager]] Check the md5sums versus the lists at [[https://help.ubuntu.com/community/UbuntuHashes]] Install the programs and run them (which is straight-forward in Windows). = Screenshots and comments = == Start and overview == === md5summer === The window at the top left corner '''MD5sums: Generating...''' is the '''md5summer''' window. It helps, but is not necessary. === Ignore this warning === There can be a warning, that you need to format the disk in drive ... (at 1) This is because Windows might not recognize the file system on the pendrive. But do not worry! The process to copy/flash/clone the iso file will overwrite the drive anyway, so it is completely meaningless to format it. === Select file === Select the ISO file that you want to use in the '''Win32 Disk Imager''' window. Click on the symbol, and get the file selector (in the right bottom corner). The default is to show image (IMG) files. ISO files are a special kind of 'synthetic image files'. They will be displayed when you select all kinds of files *.* (at 2). {{attachment:win32diskimager-1.jpg}} == Check device and Write == You can tick the box at the '''MD5 hash''' and check that it matches the value from Ubuntuhashes (instead of using '''md5summer'''). === WARNING === Check very carefully, that the device (F: in the picture) is really the USB pendrive, that you want to use. The best method is to have '''only the intended target USB drive connected''' to avoid the risk to overwrite a USB hard disk drive with all the family pictures and video clips !!! === Write === When you are sure, you can click on the '''Write''' button to start the process. {{attachment:win32diskimager-2.png}} == Confirm overwrite alias Final Warning == {{attachment:win32diskimager-3.png}} == Progress view == This demo uses a Sandisk Cruzer Blade 4 GB as target drive. It is slow (5 MB/s) but reliable for booting. A USB 3 pendrive in a USB 2 port can be 6 times faster due to faster flash memory. See [[http://ubuntuforums.org/showthread.php?t=2196858&p=12907085#post12907085|this link]]. {{attachment:win32diskimager-4.png}} == Work done :-) Remember to eject the pendrive safely == It is important to flush the buffers, to finish writing before pulling the pendrive. This is done with 'Eject safely'. It is also done at a correct shutdown or reboot. {{attachment:win32diskimager-5.png}} Good luck and welcome to the linux world! == Re-use the pendrive == In order to re-use the pendrive after installing Ubuntu, just '''format''' it completely (including MBR) using '''gparted''' in Ubuntu or '''Disk Management''' in Windows. See details in [[/FormatHelp|this link]]. = Links = You find more information at the following wiki page (and links from it) [[https://help.ubuntu.com/community/Installation/FromUSBStick]] ----- [[../|Return to the main Win32DiskImager page]] |
Return to the main Win32DiskImager page
Win32DiskImager makes an Ubuntu family USB boot drive in Windows
Introduction
A version with screenshots is published now, because it is needed ...
[This is the situation now with the Ubuntu 14.04 LTS, 15.04 and 15.10 versions] Win32DiskImager is particularly good for pre-release testing and new releases, when the standard tools like Unetbootin might not be ready (if the configuration of the booting has been changed since the previous release). |
It is possible and easy to copy/flash/clone an ISO file to a mass storage device, typically a USB pendrive. It works the same way with a memory card or an external hard disk drive or SSD. The method under the hood is the same as is described in the wiki page about mkusb.
This method works in Windows XP, Windows 8 and Windows Technical Preview (alias 'Windows 10'). I have not tested in Vista and Windows 7, but I am almost 100% sure that it works in those versions too. The following screenshots were made in Windows Technical Preview.
Graphical user interface tools in Windows
Download an Ubuntu ISO file
Download an ISO file with standard Ubuntu or one of the many Ubuntu flavours, Kubuntu, Lubuntu, Xubuntu, Ubuntu Gnome ... using your web browser or download a torrent file and get the iso file faster that way.
Download and install Win32DiskImager and md5summer
Download the following help programs
http://sourceforge.net/projects/win32diskimager
Check the md5sums versus the lists at
https://help.ubuntu.com/community/UbuntuHashes
Install the programs and run them (which is straight-forward in Windows).
Screenshots and comments
Start and overview
md5summer
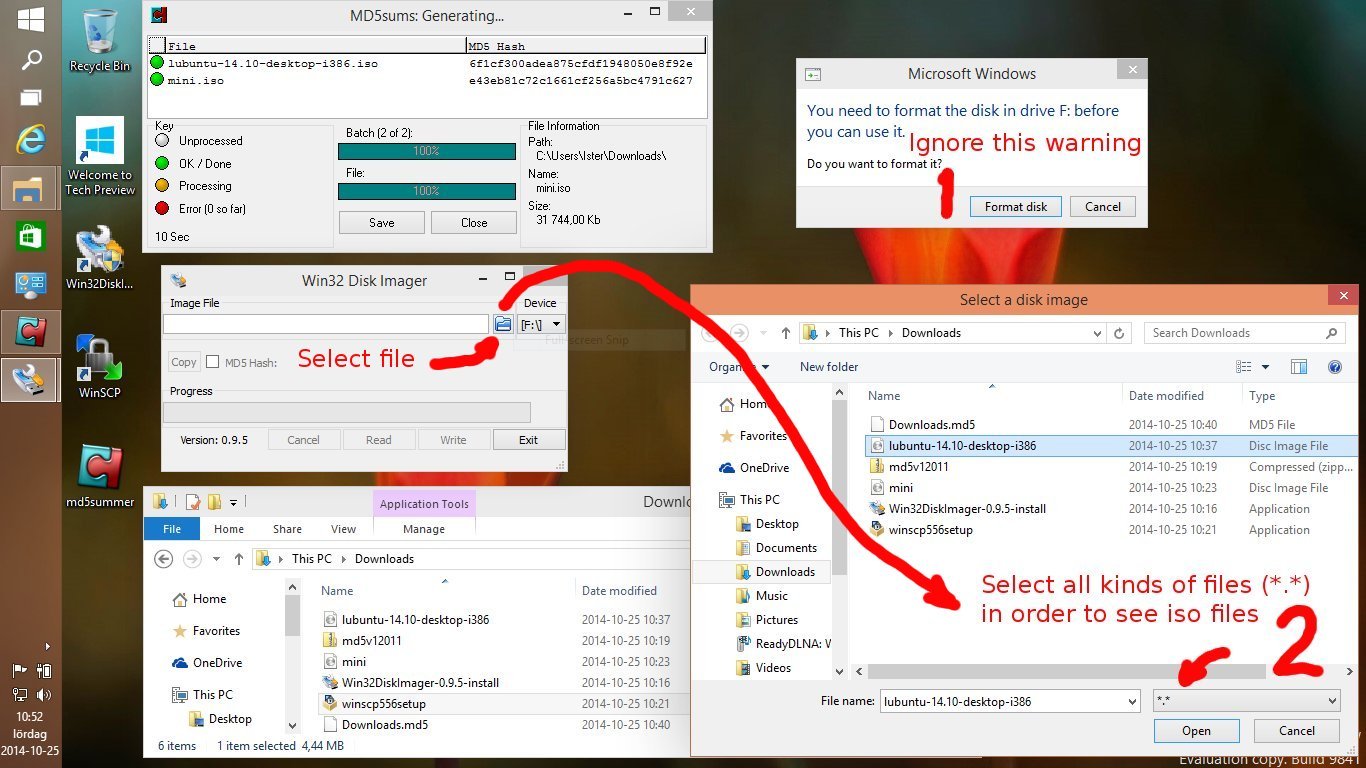
The window at the top left corner MD5sums: Generating... is the md5summer window. It helps, but is not necessary.
Ignore this warning
There can be a warning, that you need to format the disk in drive ... (at 1)
This is because Windows might not recognize the file system on the pendrive. But do not worry! The process to copy/flash/clone the iso file will overwrite the drive anyway, so it is completely meaningless to format it.
Select file
Select the ISO file that you want to use in the Win32 Disk Imager window. Click on the symbol, and get the file selector (in the right bottom corner). The default is to show image (IMG) files. ISO files are a special kind of 'synthetic image files'. They will be displayed when you select all kinds of files *.* (at 2).
Check device and Write
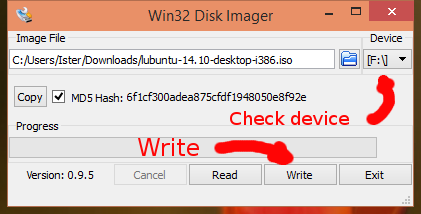
You can tick the box at the MD5 hash and check that it matches the value from Ubuntuhashes (instead of using md5summer).
WARNING
Check very carefully, that the device (F: in the picture) is really the USB pendrive, that you want to use. The best method is to have only the intended target USB drive connected to avoid the risk to overwrite a USB hard disk drive with all the family pictures and video clips !!!
Write
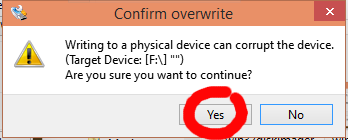
When you are sure, you can click on the Write button to start the process.
Confirm overwrite alias Final Warning
Progress view
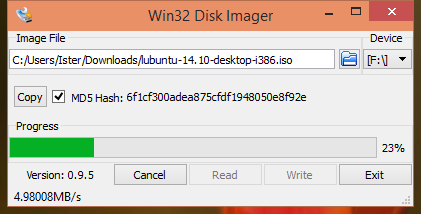
This demo uses a Sandisk Cruzer Blade 4 GB as target drive. It is slow (5 MB/s) but reliable for booting. A USB 3 pendrive in a USB 2 port can be 6 times faster due to faster flash memory. See this link.
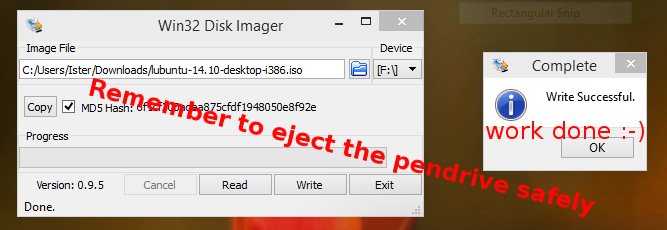
Work done :-) Remember to eject the pendrive safely
It is important to flush the buffers, to finish writing before pulling the pendrive. This is done with 'Eject safely'. It is also done at a correct shutdown or reboot.
Good luck and welcome to the linux world!
Re-use the pendrive
In order to re-use the pendrive after installing Ubuntu, just format it completely (including MBR) using gparted in Ubuntu or Disk Management in Windows. See details in this link.
Links
You find more information at the following wiki page (and links from it)
https://help.ubuntu.com/community/Installation/FromUSBStick