CreatingAnImageForUMEDevice
Creating an UME Image for your Device
TODO
- Replace the captured images for a more consistent set.
- Check for completeness and style.
Warning
This procedure was tested and worked as described. All the efforts will be taken to keep it up-to-date but bear in mind that it's based on software in development and test stages so your mileage may vary.
More recent documentation and an up to date image creation procedure can be found here
Summary
This document walks through the process of creating a working image for your mobile device using the Moblin Image Creator utility, described in detail here. Running this image on a device will boot the Linux kernel, load the appropriate drivers, start X, show the UI, and allow you to launch applications.
Supported devices
The Image Creator currently allows you to create an image for a Samsung Q1 Ultra. However, having this device is not necessary for application development. For application or driver development, or to simply test run the UI, you can run everything using Xephyr on your Linux workstation.
Development Environment
As described above, the having the target device is not really necessary. Just a PC workstation running a GNU/Linux will be enough. Theoretically, any recent Linux distribution should work but this procedure was tested on Ubuntu Gutsy Gibbon (future 7.10) and 7.04. As a series of packages from the Gutsy repositories are need to build the project, a connection to the internet is required. To transfer the final image to the device, one will need a RW-CD or USB Pen Drive (>= 512MBytes).
Concepts
The Image Creator uses the concept of Projects that are linked to Platforms and one or more Targets that is comprised of one or more "functional sets" or fsets. The Image Creator uses these elements to create an image. Each element is described below.
- Project
A project is a platform-specific build environment with one or more targets. When you create a project, Image Creator creates a full Linux filesystem in the directory you specify. Chrooting into this directory creates an isolated environment where you can develop software for your device. The environment includes apt tools, so you can install packages of the tools you need. The project directory includes one or more targets which are located in the <project location>/targets directory.
- Platform The platform is your target device. You select a platform when you create a project. This determines the kernel, system configuration, and device drivers that are made available as part of the targets you create within a project.
- Target The target is a platform-specific Linux filesystem, created in the /targets directory of your project. You create an image from a target. One or more targets can exist for each project. Like projects, you can also chroot into this environment to configure it or copy applications from your project before making an image.
- Function/Feature Set (fset) A functional (or feature) set is a group of packages representing some functional area that Image Creator can install on the target. An fset can have dependencies on other fsets. If you select to install an fset that depends on another fset, the prerequisite fset will automatically be selected and installed on the target first.
- Image An image is a large (around 350MB) file created from a target. You can specify its name. An image can then be copied to a device using a USB pen drive or CD.
Install and Run Image Creator
Installation
Just run
sudo apt-get install moblin-image-creator
Creating an Image
As described above, the image is the final result of the process. It's what's going to be used to install the file system that will run at the target device. There is two ways to create the image: using the GUI or using the command line. Both are described bellow.
Using the GUI
Start the image creator
$ sudo image-creator
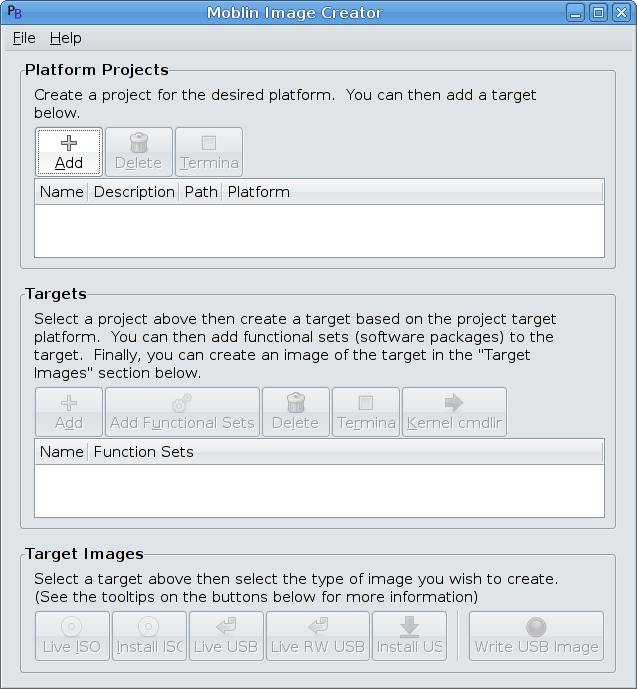
You will be presented with the main interface:
What matters for now at this moment is the Platform Project session. The three buttons are use to Add a project, Delete a project or to open a terminal chrooted into the project selected in case any manual changes are needed.
Create the Project
- Click the button Add and fill the options
- Name - Name of the project
- Desc - Description of this project (optional)
- Path - Where the projects and all related files will be placed
- Platform - Choose the target platform

Wait for the installation
The Image Builder is now creating the base project. This can take several minutes.
Create the target system
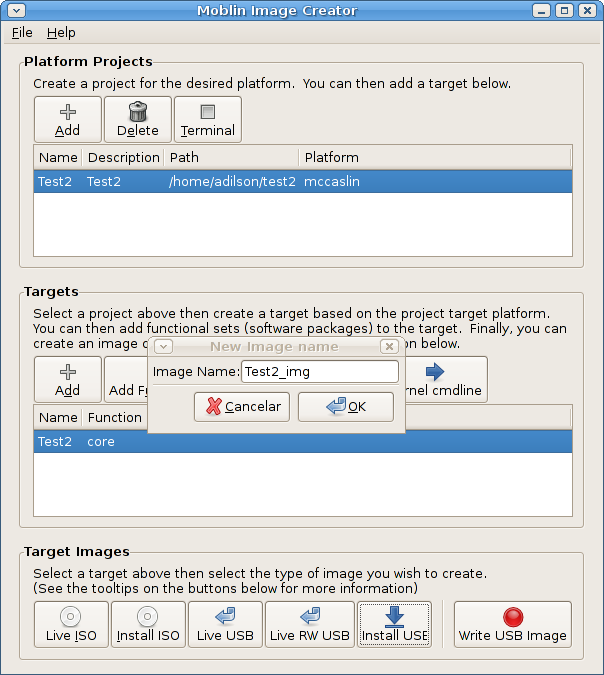
The next step is to create the target and add one or more functional sets. In this session of the interface we see the buttons Add, to add a target to the current project, Add Functional Set, to include a functional set or more to the selected target, Delete, to delete a target from the list, Terminal, to open a chrooted terminal inside the target file system and Kernel cmdline that can be used to add command line parameters to be used when the target kernel is executed.
- Name the target

Choose a functional set
After the process is done, we will have a file system ready to be transfered to the target device or we can use the Terminal button to open a chrooted terminal and run the hildon environment directly in a Xephyr session.
Generate image
The last step, which can be optional, is to create the image for the target. There are five different image styles that can be created, attached to the five first buttons in this session of the interface:
- Live ISO - Create a live ISO image that can be burned to a CD. You can run boot this CD and run directly from it. Nothing is written to the target device.
- Install ISO - Also creates a ISO image but prepared to be installed to the target device. If you boot using the resulting CD, your device will be partitioned and the image installed automatically. Beware.
- Live USB - Create a live USB image that can be burned to a USB drive. As in the Live ISO, you can run boot and run directly from it. Nothing is written to the target device.
- Live RW USB - Same as above but it supports data persistence. Every change made on the system while running this image will be saved on the USB drive.
- Install USB - Same as Install ISO but the image will be suitable to install in a USB drive.

Currently, only the Install USB image type is supported. Once the generation of the image is done, use the Write USB Image button to write it to your USB drive.
Using the command line
As stated before, the same steps above can be done using the command line. This is very handy once the parameters are already defined as we can process the whole projects in batch. The steps taken can be as simple as follows:
- Create the Project
$ sudo image-creator -c create-project                  \
                      --platform-name mccaslin            \
                      --project-name "myproject"          \
                      --project-path "/usr/src/myproject" \
                      --project-description "My Samsung Q1 Ultra project"
- Create the target system
$ sudo image-creator -c create-target          \
                      --project-name "myproject" \
                      --target-name "target1"
- Install the functional set.
$ sudo image-creator -c install-fset         \
                      --project-name myproject \
                      --target-name target1    \
                      --fset-name "full-mobile-stack"
- Create the image
$ sudo image-creator -c create-install-usb \
                     --project-name myproject \
                     --target-name target1 \
                     --image-name myproject_target1_install-usb.img
$ sudo image-creator -c chroot-target        \
                      --project-name myproject \
                      --target-name target1
And from there run the hildon-desktop with pointing to a Xephyr instance (see also Hildon Manual Procedure).
Outstanding Issues
- - Since the moblin-image-creator needs to create rootstrap images in the debian package build process, then it needs to have root privileges. A default pbuilder configuration will attempt to build the package as a non-root user (for a lot of good reasons.) Unless the Ubuntu build is configured to run as root, then this packages debian rules will need to be reworked. - The image-creator has a nasty bug that makes it crash if any fset different from "core" is selected.
Related pages
MobileAndEmbedded/CreatingAnImageForUMEDevice (last edited 2008-08-06 16:15:15 by localhost)

