InstallingBanshee
How to install the latest Banshee
There are a lot of open-source music apps out there: Amarok, Exaile, XMMS, Rhythmbox, Muine, Songbird, Noatun to name but a few. I've tried a lot of them in the hope of finding something to replace good ol' Winamp - I was a Windows user for many years. But after searching, installing and uninstalling a lot of music players I started to want a different user interface approach than the Winamp approach. Then I stumbled upon Banshee, and I quickly became attracted by it's simple user interface, even if it was inspired by Apple's iTunes.
Unfortunately it's not so easy to install Banshee, or at least not for the beginner GNU/Linux user. Installing it from the repositories is not a very good option, because the developers of Banshee release a new version almost every month, and the version in the repositories tends to get outdated pretty fast. So the way of fully enjoying the features of this app is to install it from source, which can sometimes prove to be pretty difficult.
If you don't want to read through the whole guide you can just open a terminal and type:
sudo apt-get install banshee
This will install Banshee 0.9.7.1 if you have Breezy, 0.10.10 if you have Dapper, 0.11.1 if you have Edgy and 0.12.0 if you have Feisty Fawn. At the time of this writing Banshee reached 0.12.1 and will release 0.12.2 any day now. It probably doesn't seem like too much of a difference, but trust m, it is.
If you want to have the latest version of the media player, this is where this howto comes in handy. I will give you a step-by-step guide with explanations here and there and with some screen shots so you will not only install Banshee, but also understand a little of how these things work. Let's get started.
I. Enabling extra repositories and uninstalling previous versions of Banshee
Especially if you have Dapper installed, old versions of Banshee can actually make things trickier when installing new versions, so that's why we must get rid of the already installed one. And don't worry, none of your settings from your old installation will be lost. So here we go:
1. Enable extra repositories:
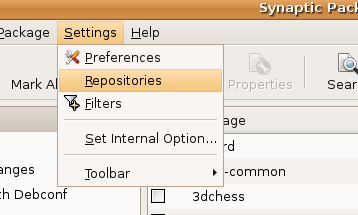
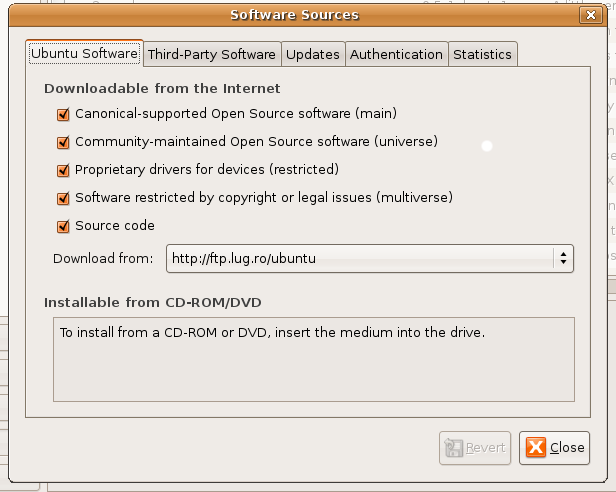
Go to System>Administration>Synaptic Package Manager, enter you password and go to Settings>Repositories as shown in the pictures below


I have Feisty Fawn installed. Edgy Eft should look similar to this, but Dapper looks a little different. However, it's not too hard to enable the repositories in Dapper.
2. Update your system:
Open up a terminal from Applications>Accessories>Terminal and write:
sudo apt-get update
- This will ensure your system is kept up-to-date (do not close this terminal because we will be needing it later)
3. Uninstall previous versions of Banshee installed via synaptic:
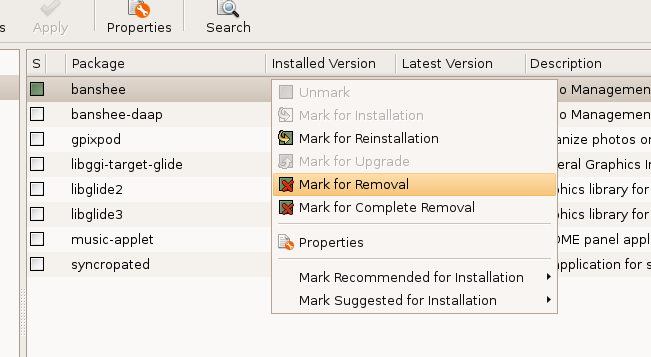
Search for packages named "banshee" and remove everything you see marked with a green square (banshee-daap, banshee-official-plugins etc), like in the picture below:

It's important that you click "Mark for Removal" not COMPLETE removal; this option will delete all your settings as well.
Then click "Apply" and after that is finished close synaptic because we won't be needing it anymore. (note that if you don't close synaptic you will get errors in using the terminal because only one package manager can run at the same time)
4. Install the dependencies for building Banshee and for playing many of the popular formats:
Note that some of these, such as the mp3, the aac, wma and other formats are proprietary; installing these might be illegal in your country, especially if you live in the US and using them would mean supporting closed-source software, which is just wrong; there are many open-source formats such as ogg or flac and they all provide excelent capabilities; you can read more on open-source : here
Go to the Terminal and type (one line at a time, and press Enter after each line ):
sudo apt-get build-dep banshee
sudo apt-get install build-essential libmono-sqlite2.0-cil
sudo apt-get install libmono-cairo2.0-cil libglib2.0-dev libtool
sudo apt-get install subversion autoconf automake1.9 gnome-common
sudo apt-get install libavahi1.0-cil gstreamer0.10-plugins-base
sudo apt-get install gstreamer0.10-plugins-good
sudo apt-get install gstreamer0.10-plugins-ugly
sudo apt-get install gstreamer0.10-plugins-bad
sudo apt-get install gstreamer0.10-plugins-ugly-multiverse
sudo apt-get install gstreamer0.10-plugins-bad-multiverse
sudo apt-get install gstreamer0.10-ffmpeg gstreamer lame
sudo apt-get install libnjb1 libnjb-dev libipoddevice0
sudo apt-get install libipoddevice-dev
Install portable player support
You need to install special dependency files for iPod and NJB media player support. If you do not own and if you don't plan to use any of these two players procede to the next step, but if you do, follow these instructions too.
a)NJB sharp support
Write in a terminal:
cd
svn co svn://svn.myrealbox.com/source/trunk/njb-sharp
cd njb-sharp
./autogen.sh --prefix=/usr --disable-docs
make
sudo make install
cd
b)iPod sharp support
NOTE: When I did this today (4/7/07) on edgy, i found my libipoddevice was too old for ipod-sharp to compile - the current ipod-sharp from svn wants libipoddevice 0.5.3 or better. Here's what I did to fix that:"
svn co http://svn.gnome.org/svn/libipoddevice/trunk libipoddevice
cd libipoddevice
./autogen.sh --prefix=/usr --disable-docs
sudo apt-get build-dep libipoddevice
make && sudo make install
then you can continue with getting and compiling ipod-sharp.
Write in a terminal:
svn co svn://svn.myrealbox.com/source/trunk/ipod-sharp
cd ipod-sharp
./autogen.sh --prefix=/usr --disable-docs
make
sudo make install
cd
6. Remove every left-over library of Banshee:
In case you've previously installed Banshee from source, this will remove the old library files so there won't be any problems with the new version. Write in the terminal:
cd /usr/lib
sudo rm -R banshee
cd /usr/local/lib
sudo rm -R banshee
cd
cd .gnome2/banshee/plugins
rm -R recommendation
If you get a message saying that the folders or files could not be found it means that there is no more Banshee in your system files and we can move on to the next step.
II. Downloading and installing Banshee from SVN
SVN is different than source tarballs because the files here get updated almost daily, providing the latest code. Usually SVN snapshots - that's how they are called - present a few problems regarding stability, but since Banshee is beta software anyway - I might have forgotten to mention that in the beginning hehe - there isn't much difference between the stability of a tarball and that of SVN. With that being said, it's worth mentioning that Banshee doesn't crash often, actually in my case it only crashes sometimes when dealing with my USB mp3 player. It really is pretty darn stable in all it's betaness.
1. Download Banshee from SVN:
Type in a terminal:
cd
svn co http://svn.gnome.org/svn/banshee/trunk/banshee
2. Compile and install Banshee:
This might take a little while, anywhere between 5 to 20 minutes depending on your processing power, so after entering the "make" command you can go get a good cup of tea. Note that if the first command gives you any errors it's most likely you didn't carefully cover the steps before, so look them over once or twice before posting on the forum and requesting for help
cd banshee
./autogen.sh --disable-docs --prefix=/usr
make
sudo make install
cd
Now you have successfully installed Banshee with NJB media player and iPod support and with a bunch of default plugins installed. They are all very helpful plugins that increase Banshee's practicality. But if you're looking for even more plugins, there are four more you can install, but you should know that these are not official and haven't been included in the default package because they are not that stable. Install them using your own judgment.
III. Installing extra plugins
You can still use Banshee while installing these plugins so there's no need to close it. However, they will only be available to you after you restart the program.
1. The clean up plugin
The most stable of all of these (actually it never crashed on me), cleans the library of any deleted or moved files; write in a terminal:
svn checkout http://banshee-cleanup-plugin.googlecode.com/svn/trunk/ banshee-cleanup-plugin
cd banshee-cleanup-plugin
./autogen.sh --prefix=/usr
make
sudo make install
cd
2. The alarm plugin
Lets Banshee act as an alarm clock; write in a terminal:
svn co svn://svn.banshee-project.org/trunk/banshee-alarm-plugin
cd banshee-alarm-plugin
./autogen.sh --prefix=/usr
make
sudo make install
cd
3. The album art plugin
Displays album covers on the screen corresponding to the current song; write in a terminal:
svn checkout http://album-art-plugin.googlecode.com/svn/trunk/ album-art-plugin
cd album-art-plugin
./autogen.sh --prefix=/usr
make
sudo make install
cd
4. The track-on-change notification plugin
Displays a configurable popup on the screen when a new track begins playing; write in the terminal:
svn checkout http://showtrackonchange.googlecode.com/svn/trunk/ showtrackonchange
cd showtrackonchange
./autogen.sh --prefix=/usr
make
sudo make install
cd
The four plugins are now installed. To use them restart Banshee and select them from Edit>Plugins.
IV. Cleaning up
And the last and final step, cleaning up you home folder for downloaded files; write in a terminal:
sudo rm -R album-art-plugin njb-sharp banshee banshee-alarm-plugin showtrackonchange banshee-cleanup-plugin ipod-sharp trunk
Then close the terminal. You are done! Yes it took quite a while, but now you have the newest version of Banshee up and running. This must make you feel all fuzzy inside. :P
V. Updating Banshee
Of course, if you are like me, you're going to want to update you Banshee installation from time to time. Whenever you want to do that the best thing to do is to repeat all these steps over again. This ensures that everything is up-to-date. I know it's back-braking work, but in the end it's all well worth it.
Disclamer
All these steps were covered by me too, first on an Edgy Eft install and then on a Feisty Fawn install and everything worked alright. I do not take any blame if your system gets damaged after following this tutorial. And I repeat, if you encounter an error check out the steps once or twice more, and only then go to the forums and post your problem.
These instructions are the work of a lot of researching from my part on webforums, blogs and on Banshee's official page. I do not take credit for them, but giving credit is impossible because there are so many sources; it is irrelevant to try to do so.
With all these being said I hope you found this howto helpful. Cheers!
Victor Doman (reborn579@gmail.com)
UbuntuMagazine/HowTo/InstallingBanshee (last edited 2008-08-06 17:01:02 by localhost)