HowToSharedHome
How to run two versions of Ubuntu with a shared /home
Backup you package list
In this step we will run a command that will backup the list of packages you have installed.
On your current installation open a terminal and run:
$ dpkg --get-selections > dpkg.selection
Then when you have the setup done properly, you can reinstall the packages by running the following commands:
$ dpkg --set-selections < dpkg.selection
$ sudo apt-get dselect-upgrade
If you have not added many packages, you can optionally note the packages you have installed, as they will have to be downloaded/installed again.
If any daemons are used, their specific config file(s) usually found under /etc, so you may want to back that up as well.
Explanation: the /home directory holds your user configuration files. Applications will be re-downloaded but usually they will be a newer version. To avoid all the manual work, saving the package list will simplify making sure that both jaunty and intrepid have the same applications.
Backup /home onto an external disk
This is important because /home contains the personal files as well as the users program configuration files. This is an important step that should not be skipped. It is recommended that this is done using a live CD, with sudo access. Graphically you would need to mount the disk you use, then open it as root (by pressing alt-f2 and typing in
gksudo nautilus /media/your_disk_name_here
This will bring up a graphical nautilus window as root. Right click on the "home" folder; you can then copy over /home from the internal disk to the external disk, using that window. It can also be done via the command line by mounting the internal disk and then copying using the command.
sudo cp /media/disk/home /media/disk-1
You will want to make a quick check afterwards to make sure both directories are the same size, for this you can right click > properties or you can run the command
du -sh /media/disk/home
and
du -sh /media/disk-1/home
Resize your partition
Now that you have backed up the /home directory, and got the package list (and for advanced users, the /etc config files as well...) we can destroy everything on the drive. If you are not comfortable with this, it means that you have never done it or you are not completely sure you have backed up all your files, you should be sure that you are able to recover /home from the backup.
We will setup a /home partition to be shared among two versions of Ubuntu. The actual partition map should be 3 primary partitions and a swap partition contained within an extended container. It should look like this (for a 160GB disk)
- 10GB ext3/4 for first ubuntu release /
- 10GB ext3/4 for second ubuntu release /
- 135GB ext3/4 for shared /home
- 5GB for swap (it is recommended that swap be 2x what you have for RAM)
To modify the partitions on you disk, use the GNOME Partition Editor (gparted) (found in System > Administration > Partition Editor/Gparted). Create two 10GB ext3 partitions, one swap partition, about twice the amount of RAM you have, and one /home partition taking up the rest of your drive.
Once you have applied the changes, each partition will be given a device name (ex. /dev/sda1)
HDD: [ / ] [ / - beta ] [ /home ] {[ SWAP ]}
I recommend 10GB, but your needs may be different if you have many programs or perhaps a smaller hard drive. To find out the actual size of your / partition without /home so you can get an idea of what size you should use, run the following command:
$ sudo du -sh --exclude=/home --exclude=/proc --exclude=/dev --exclude=/media --exclude=/tmp /
-or-
$ sudo du -sh $(for i in /home /proc /dev /media /tmp; do echo --exclude=$i; done) /
I recommend that you use gparted to size the partitions first then go though the installation of the stable release followed by the development version and then setup the /home partition to be shared among both by configuring it using ubiquity (Ubuntu Installer) manual partitioning tool for each installation (or by editing /etc/fstab on both root partitions, if done after the install).
First Release Installation
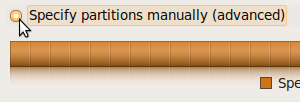
- Usually at step 4 (Partitioning Disks) Select "Specify partitions manually (Advanced)"

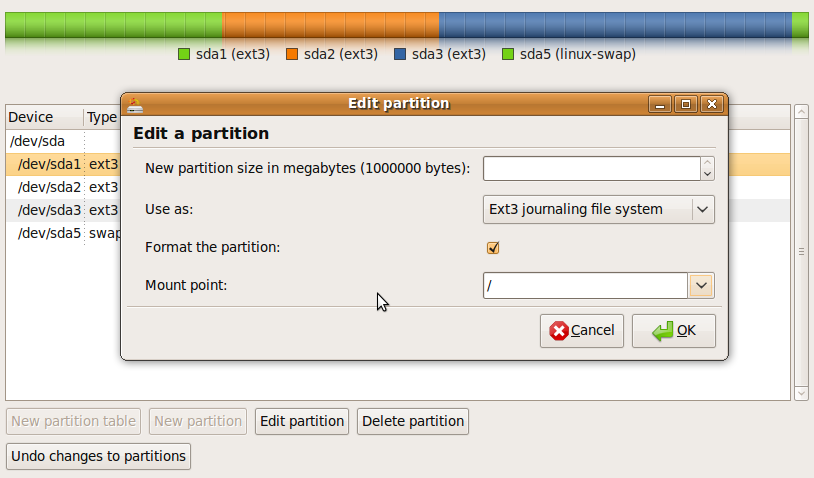
- Select the first 10GB partition (previously created in gparted) and click on "Edit Partition/Change"

- Use as ext3, format the partition and use is as the root "/" mountpoint
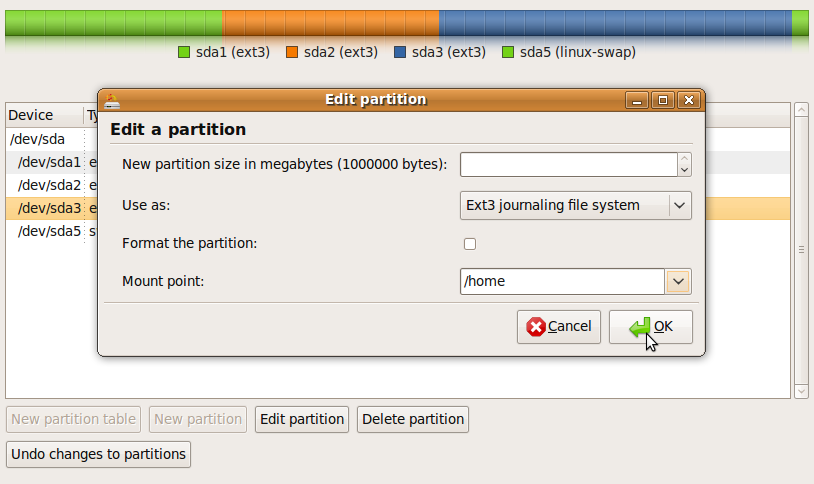
- Select the large partition device that we will use as /home and click on "Edit partition"
- Use as ext3, and use is as the home "/home"

Second Release Installation
- Usually at step 4 (Partitioning Disks) Select "Specify partitions manually (Advanced)"

- Select the second 10GB partition and click on "Edit Partition"

- Use as ext3, format the partition and use is as the root "/" mountpoint
- Select the large partition device that we will use as /home and click on "Edit partition"
- Use as ext3, and use is as the home "/home"

Final Notes/Warnings
- Now all you need to do is move your home directory contents back into place on the large drive and that should work. If you have issues with file permissions just use the chown command to fix folders recursively.
$chown -R username\: /home/usename
- Certain applications to not work properly with shared home. For these please report bugs for backwards compatibility. Some of these issues (such as configuration file/folder name changes) can be quickly fixed with a few symbolic links.
This setup is intended for one computer and one user. If you set up multiple users, do it all at the beginning, and in the same order. This will avoid having mixed user<->UID relationships causing permission issues.
komputes/HowToSharedHome (last edited 2009-12-19 03:56:59 by modemcable097)