HowToUbuntuUSB
usb-creator
Please note that for simple tests, usb-creator should be enough to transfer a LiveCD to a USB stick. The recommended way to test a release LiveCD or install Ubuntu from a USB flash drive is to use the usb-creator program (System > Administration > Startup disk creator), point it at a ISO image of a Ubuntu installation CD that you have downloaded, inser a blank USB drive (beware of picking/formatting the wrong drive) and let it create a bootable USB that you can use instead of the CD.
- Acquire the correct Ubuntu installation files ('the ISO') and tools
- Put Ubuntu onto your USB drive
- Configure your computer to boot from USB drive and boot from it
- Try Ubuntu or install to your hard drive.
Full persistent Ubuntu installation
If you need to install 10.04 onto a USB drive for more regular use and you would like persistence (for things like nvidia drivers, broadcom drivers, configurations, updates etc.) I suggest preforming a regular installation, except you have to make sure that you select the "Advanced/Manual Partitioning" also in older version of ubiquity you need to select the "Advanced" options at the end (right before the install starts) and select to install the MBR on the USB drive. On newer versions, you must preform an advanced installation at the partitioning stage. The reason is that ubiquity will install install the MBR on the internal drive (Bug #684292) instead of USB drive (making the USB drive non-bootable). After creating the disk, pressing the bios or boot meny key to boot from USB.
10.04
- Boot the LiveCD or LiveUSB and plug in a blank USB key as the install target.
- Select "Install Ubuntu"
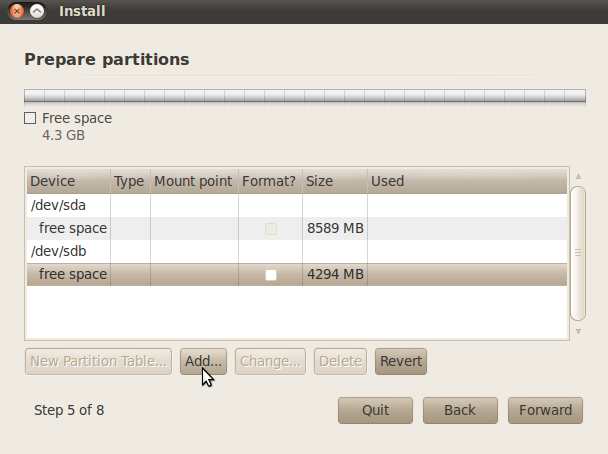
- Go through the installer as you would, until the "Prepare disk space" stage
- Select "Specify partitions manually"
- Click on the USB device (sdb in the example)
- Click "New partition Table..."
- Click on the newly created "free space"
- Click "Add..."

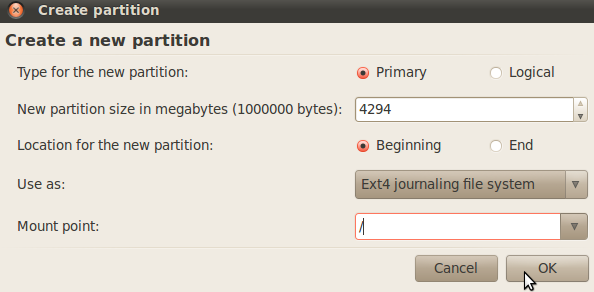
- In the Create Partition windows use the following answers:
Type: Primary
New partition size: leave default or make smaller if you want to add optional swap space
Location: Beginning
Use as: ext4
Mount point: /

- Clock OK to exit the Create Partition windows
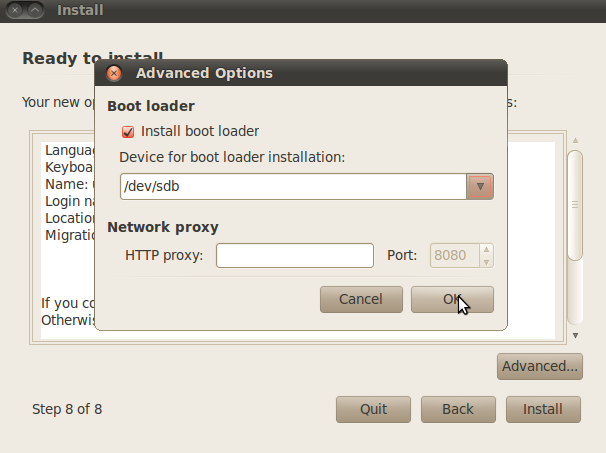
At the last stage of the installer, you will see an "Advanced" Button. Clicking it will allow you to select which drive the MBR gets installed to This NEEDS to be set to the target device (in this example sdb) or else the USB may not be bootable without this computer. If you use Windows on this computer, failing to do this will write over the MBR pointing to the Windows bootloader.

- Continue with Installation
11.04
- Boot the LiveCD or LiveUSB and plug in a blank USB key as the install target.
- Select "Install Ubuntu"
- Go through the installer as you would, until the "Partitioning" stage
- Select that you want to preform "Something Else" which means Manual/Advanced Partitioning
- Click on the USB device (sdb in the example)
- Click "New partition Table..."
- Click on the newly created "free space"

- Click "Add..."
- In the Create Partition windows use the following answers:
Type: Primary
New partition size: leave default or make smaller if you want to add optional swap space
Location: Beginning
Use as: ext4
Mount point: /

- Clock OK to exit the Create Partition windows

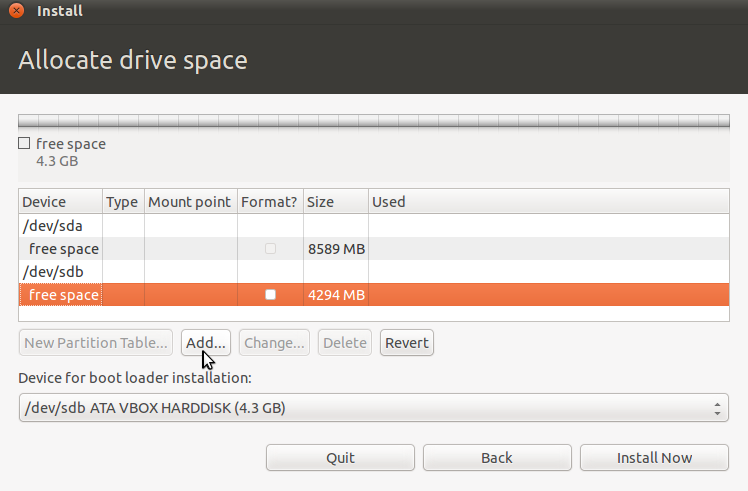
At the bottom of the Allocate Drive space window there is a pull down menu. This NEEDS to be set to the target device (in this example sdb) or else the USB may not be bootable without this computer. If you use Windows on this computer, failing to do this will write over the MBR pointing to the Windows bootloader.

- Continue with Installation
komputes/HowToUbuntuUSB (last edited 2011-08-12 22:04:49 by komputes)