Virtualbox
Using Virtualbox for Ubuntu ISO Testing
Author: Jonathan Marsden
Date: 27 June 2013
Aims
This document aims to provide enough information for people to:
Understand enough to install and use VirtualBox for Ubuntu ISO testing
Be able to create, configure and use VirtualBox
- Be aware of the limitations of this kind of testing
Introduction
Virtualbox is free software that allows the creation and use of one or more virtual computers "inside" a real physical machine. This is very convenient for testing installation of Ubuntu without needing a spare machine (or many spare machines). These virtual machines can have virtual hard disks, CD/DVD drives, network cards, sound cards, and displays. See http://virtualbox.org for more details.
Installing VirtualBox
- Requirements:
- i386 or amd64 physical host PC running Ubuntu (or Windows or OS X, if necessary!)
- At least 2GB RAM is recommended (4GB or more is better)
- At least 6GB free disk space is recommended (more is better)
To install VirtualBox on Ubuntu Quantal 12.10 or Raring 13.04, use the command:
sudo apt-get install virtualbox -y
If your host PC is running an earlier Ubuntu release, consider downloading VirtualBox as a .deb file directly from https://www.virtualbox.org/wiki/Linux_Downloads , and then installing that version with a command like:
sudo dpkg -i virtualbox-4.2_4.2.12-84980~Ubuntu~lucid_amd64.deb
Obtaining an ISO to Test
See the classroom session on zsync for details
Basically, just install zsync:
sudo apt-get install zsync -y
Then use it to download the latest daily-live ISO file you want to test, for example:
zsync http://cdimage.ubuntu.com/lubuntu/daily-live/$(date +%Y%m%d)/saucy-desktop-amd64.iso.zsync
Running that command again will update changed portions of the ISO, not re-download the whole file.
Run that same command tommorrow, and your ISO will be updated to that day's ISO image, only downloading the changed parts of the file.
Do something similar in a cron job, and you can update your ISOs automatically while you sleep!
Creating a Virtual Machine
To create a new virtual machine using the Virtualbox GUI:
Run VirtualBox:
virtualbox &
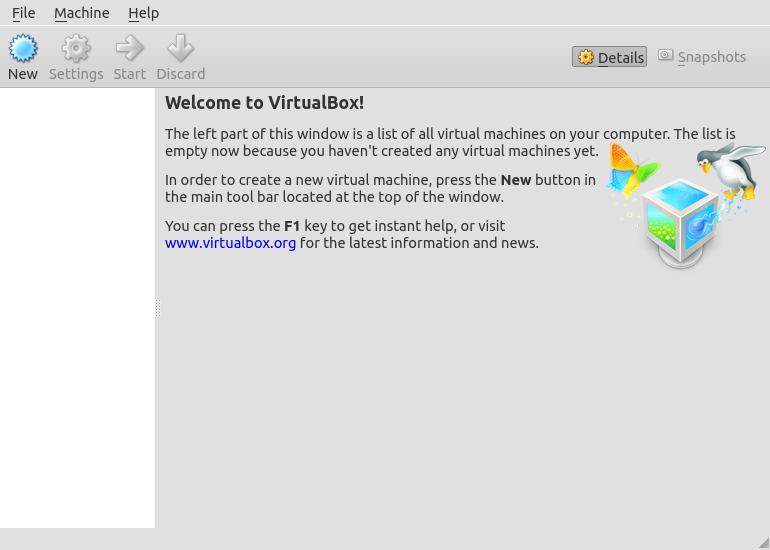
Click on the New button to create a new virtual machine.
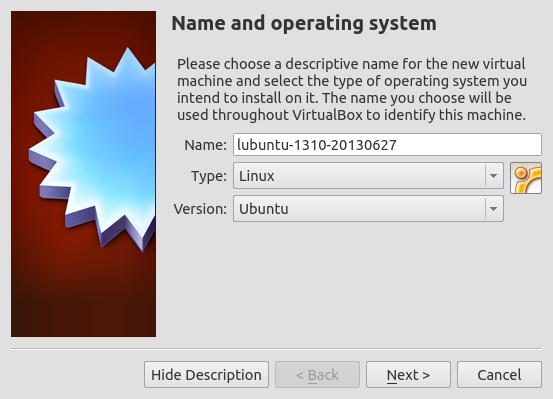
Enter the name of the virtual machine and select Ubuntu as the OS
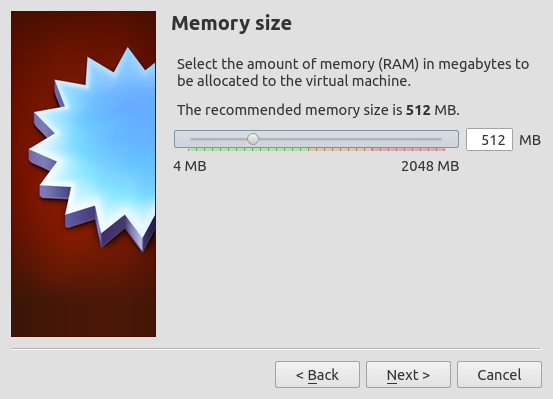
Choose the amount of RAM this VM will have, usually 512MB or 1024MB
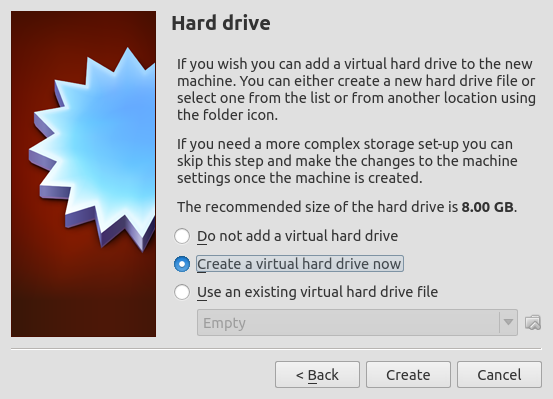
Choose a virtual hard drive (default is to create a new one, do that)
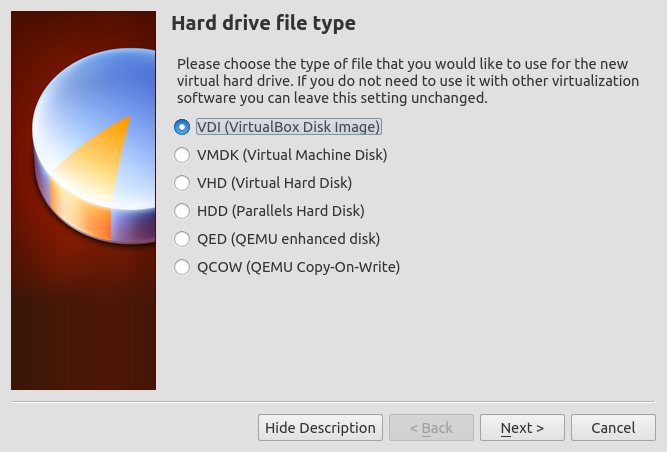
Leave the type of the virtual hard drive alone, .VDI is fine
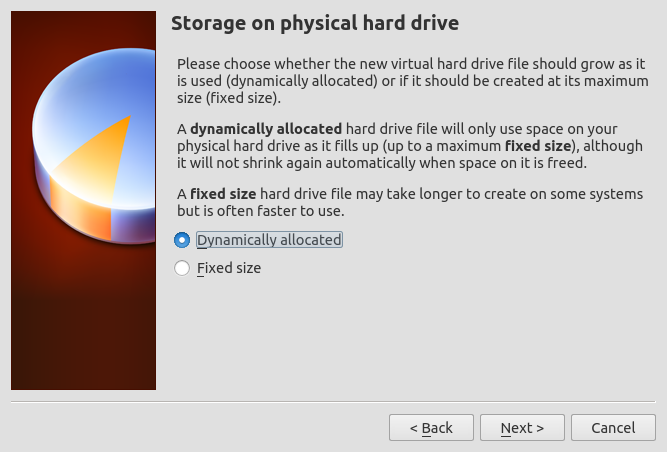
Leave the storage type as dynamic, so you use less real disk space
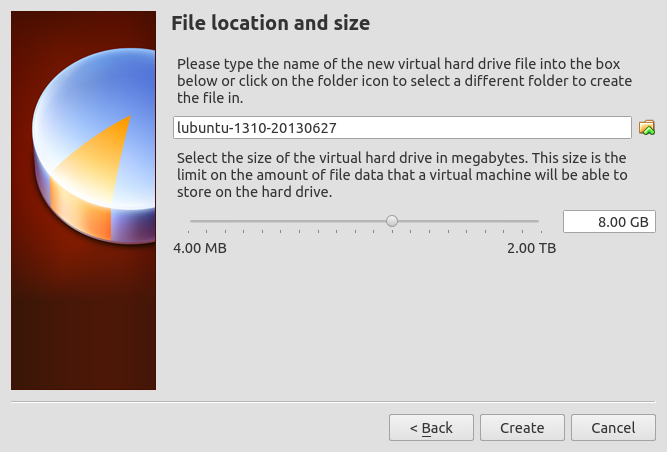
Select the size of the new virtual disk, 8GB is suggested and is default. 6GB is also fine for many ISO tests.
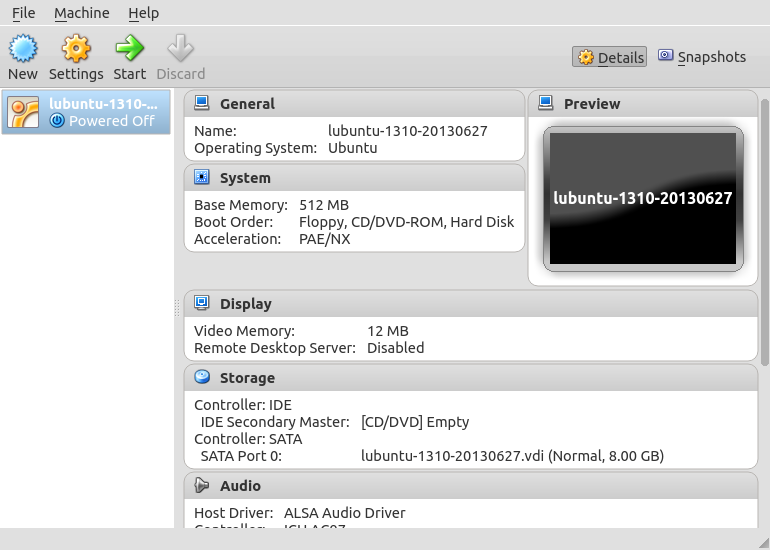
If all went well, you will see a new virtual machine appear on the left. Adding more virtual machines will result in a list of your available VMs appearing on the left.
Note: Choosing 64bit vs 32bit default settings, which was done in older versions of VirtualBox, is no longer needed.
Choosing which ISO image to use as a CDROM/DVD
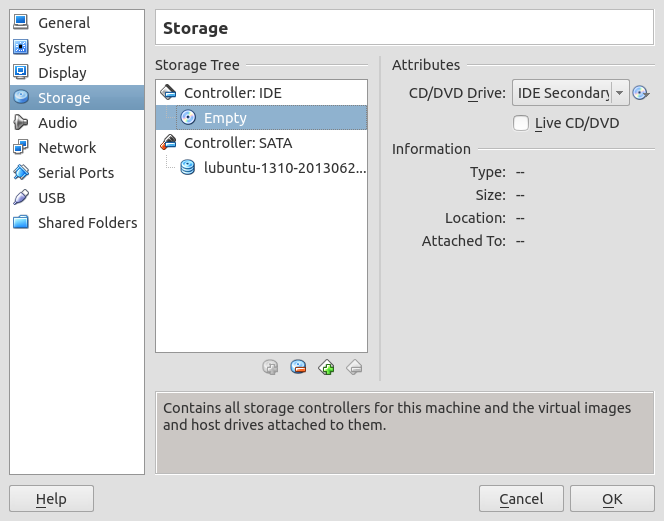
Clicking on the Storage section of the right side of the Virtualbox GUI and then on the "Empty" virtual CD/DVD drive allows you to click on a small picture of a CD on the far right and then select an ISO file to use as a "virtual" CDROM/DVD to put in the drive.
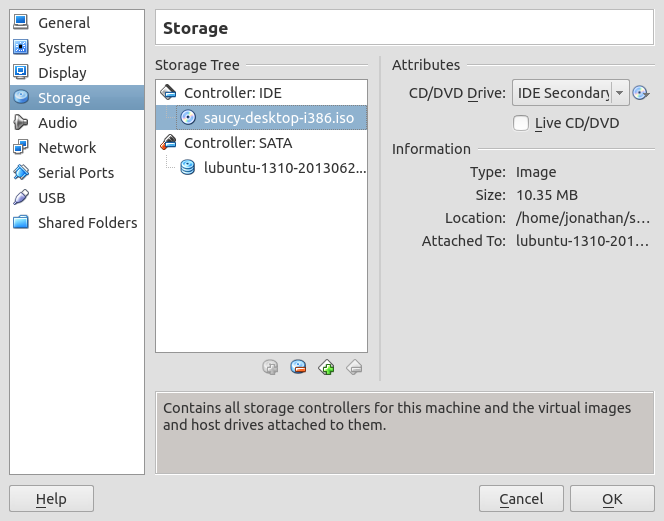
Choose the ISO image you are going to test, and click OK.
One benefit of using a virtual CD or DVD (an ISO image file) to test with is that you do not need to actually "burn" the file to real optical CD or DVD media at all, saving both time and media costs.
Configuring a Virtual Machine
A default virtual machine may work for ISO testing, but changing a couple of settings can help.
Choosing a networking type -- suggest Bridged not NAT
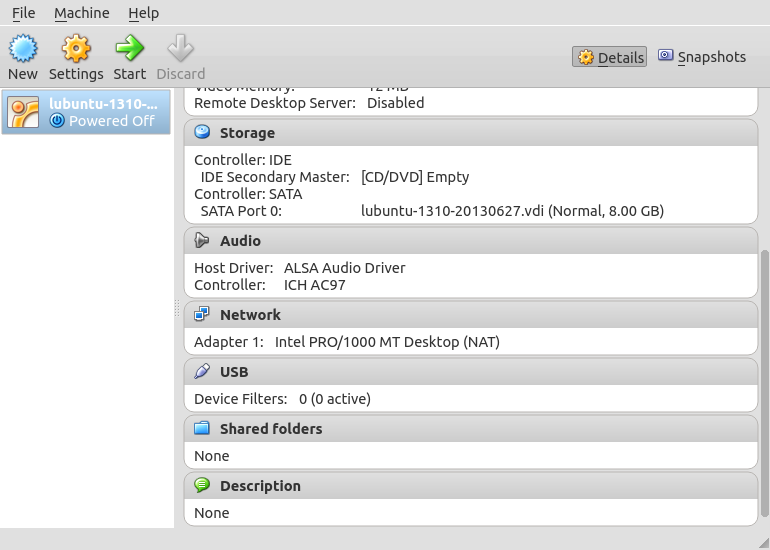
Scroll down the right hand part of the Virtualbox GUI screen and then click on the Network subsection.

Bridged networking makes the virtual machine appear on the network it is bridged to (usually your local LAN). So in that sense it is just like other machines on that network, it can see your local DHCP server, router, etc. and other machines can see it, and use services it runs.
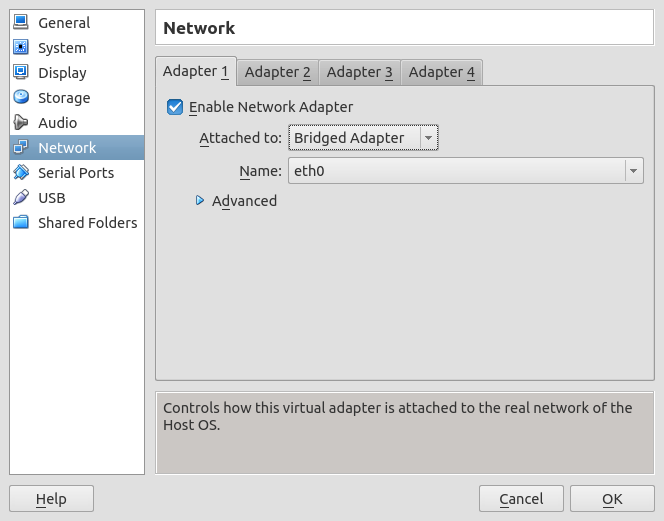
NIC type - using virtio for lower overhead
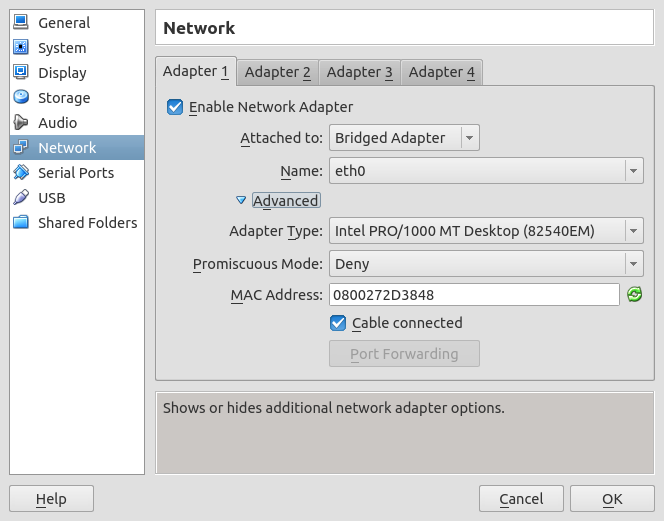
Clicking "Advanced" with show more details of the virtual NIC. Using the default NIC will work. However if you are running Linux in a VirtualBox VM, and the host OS on the real physical machine is Linux, you will get improved networking performance by selecting the "virtio" para-virtualized NIC driver instead of emulating an actual physical NIC.

Click on OK to make your desired changes.

Note that the Network section now shows the use of a virtio adapter in Bridged mode.
Adding any additional disks, serial ports, etc.
These are not usually needed for ISO testing. VirtualBox can emulate additional disks, serial ports, or displays if you wish.
Booting and Running a Virtual Machine
- Using GUI -- double click the virtual machine
- From CLI:
VBoxHeadless --startvm name-of-vm &
- Removing/Ejecting a Virtual CD or DVD:
VboxManage modifyvm name-of-vm --dvd none
From a running VM click Devices -> CD/DVD Devices... -> Remove disk from virtual drive.
- You Can also right-click on CD icon and select Remove disk from virtual drive.
Note that the CD icon in lower right becomes "greyed out".
Stopping a Virtual Machine
- Just shut down the VM:
sudo shutdown -h now
Or use the Ubuntu GUI within the VM to shut it down. Just like a real physical machine.
- From Virtualbox GUI
Click Machine -> Close -> Power Off
- From Virtualbox CLI tools:
VboxManage controlvm lubuntu1310 poweroff
- Just kill the VM and all other VMs (if all else fails!):
killall VirtualBox
Other VirtualBox Features
These are not needed for ISO testing, but nice to know about:
Installing Guest Additions
- Allows better mouse integration, including easy cut and paste between VM screen and host applications
- Allows resizing of VM screens
Is a good idea for real world GUI VirtualBox use, not essential for ISO testing use
Sharing file space (needs Guest Additions)
- Allows the host and a virtual machine to share some host disk space
See https://www.virtualbox.org/manual/ch04.html#sharedfolders
- More useful for real world Virtualbox use than for testing
- Can be useful to transfer files from the virtual machine's virtual disk to the host.
You can use scp to transfer files if you do not have shared files set up
Remote Desktop access to virtual screens
- Allows remote over-the-network RDP access to the GUI (virtual) screen of virtual machines.
Extension Pack for direct USB device access
- Allows a virtual machine to use a physical USB device such as a scanner or USB stick
Is closed source proprietary code, with a zero-cost licence for personal use only
- Use it only if you need it
For printing from VMs, consider sharing the printer on the host PC and using network printing, so both host and VMs can "see" the printer at the same time.
- Booting a VM from USB is **not** supported, unfortunately
Limitations of Virtual Machine Testing
- Not using real hardware (no BIOS bugs, weird video cards, etc.)
- No wireless NIC access (virtual NICs are "wired" NICs)
- No boot from USB (so testing Live USB stick "persistence" is not possible, please use a physical PC to test that)
- Not easy to test or use special purpose hardware (Braille readers, USB devices, scanners, SCSI controllers, etc.) in VMs
Further Reading
- To manage Virtualbox from the command line, see:
man vboxmanage
- To start Virtualbox machines from the command line, see:
man vboxheadless
The full Virtualbox User Manual is online at https://www.virtualbox.org/manual/UserManual.html
Testing/Activities/Classroom/Saucy/Virtualbox (last edited 2013-06-27 23:50:47 by static-108-13-137-26)